Picklist Editor
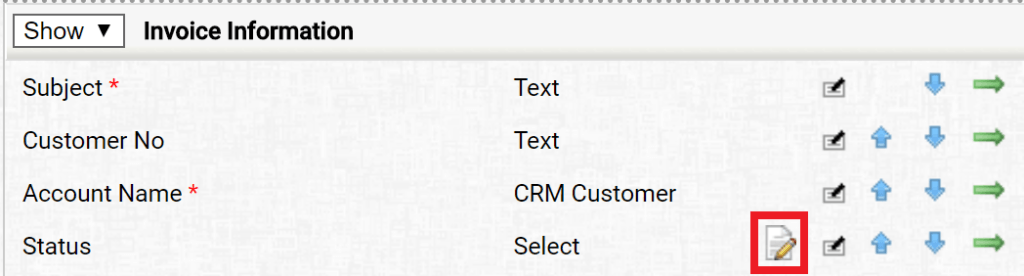
Picklists can be created in the layout editor of the module. You can add, edit and remove the values in this picklist in the picklist editor by clicking the edit button ![]() on the picklist’s row (see the picture below).
on the picklist’s row (see the picture below).
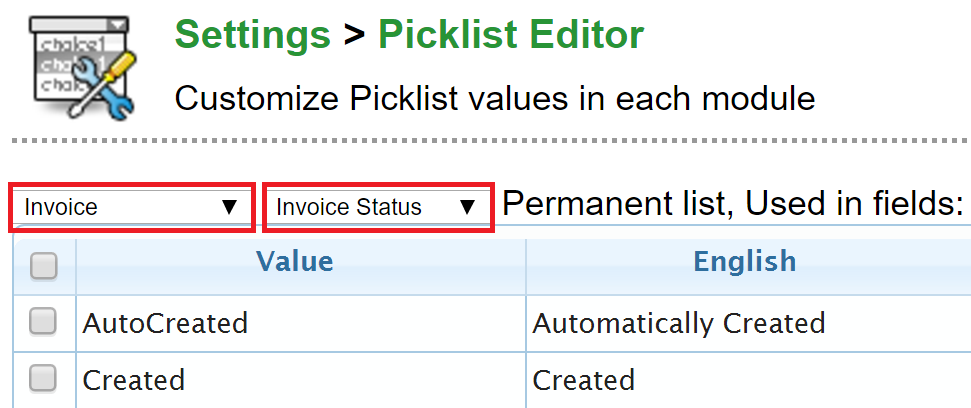
Another way to get to the picklist editor is through settings (Settings → Picklist Editor), but this option does not show the correct picklist right away.
Right below the header there are two picklists (see the picture below). In the left one, you can select the module whose picklists to view and edit. The existing picklists in the module are listed in the right picklist.
When you have selected a picklist to be edited, you can add single new values to the picklist with the adding ![]() button at the bottom left corner of the table. You can edit the existing value translations by selecting one or more value rows to edit and entering the edit mode (see the picture below) by clicking the edit button
button at the bottom left corner of the table. You can edit the existing value translations by selecting one or more value rows to edit and entering the edit mode (see the picture below) by clicking the edit button ![]() on the bottom left corner of the table. The values themselves cannot be edited afterwards. If the value has to be replaced with a new one, a new value must first be created, after which the old one can be deleted. When a single value is deleted, the system asks in this context which new value the existing field data is to be transferred to.
on the bottom left corner of the table. The values themselves cannot be edited afterwards. If the value has to be replaced with a new one, a new value must first be created, after which the old one can be deleted. When a single value is deleted, the system asks in this context which new value the existing field data is to be transferred to.

You can delete values by selecting the row(s) desired and clicking the Delete button ![]() . When you select all the rows and delete the whole pick list, it will be first moved to the “Not in module” module, from where it can then be deleted permanently.
. When you select all the rows and delete the whole pick list, it will be first moved to the “Not in module” module, from where it can then be deleted permanently.
It is also possible to create values in mass. On the right-hand side of the picklist, there is a button that can be used to enter values by copy & paste for a larger group at a time. Values need to be written one per row. By clicking the Save button, all the entered values are created to the picklist at once.
Note: It is not possible to add translations in the mass import.
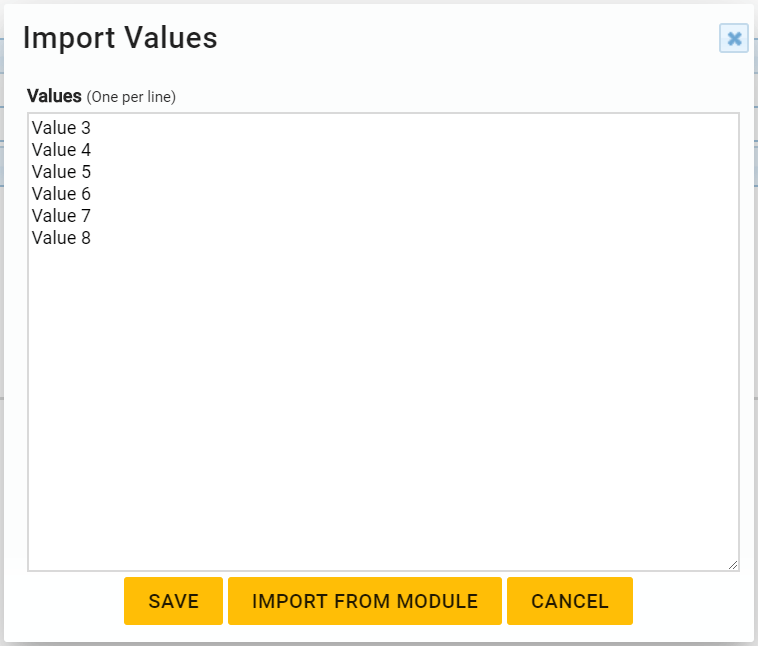
The window for mass import has also another button, Import from module. This feature searches for values, that have been imported to the picklist, e.g. in a CSV import or via an integration, but could not be matched with the picklist’s existing values.
By default, the checklist and all its values are public (visible to all users). If there is a need to limit the use of the values, you can customize the visibility of the values in the selection list for certain user roles with the buttons Add to roles ![]() and Remove from roles
and Remove from roles ![]() . The role view can be set for only certain values or for a picklist as a whole (all its values). For example with this the same picklist can be used by different user roles but with different values inside to see. Multiple roles can be selected at once – for that keep the Ctrl button down and choose the roles needed.
. The role view can be set for only certain values or for a picklist as a whole (all its values). For example with this the same picklist can be used by different user roles but with different values inside to see. Multiple roles can be selected at once – for that keep the Ctrl button down and choose the roles needed.
You can edit the order of the values by dragging the value to the place where you want it.
You can make a new picklist either through
- Picklist Editor, where the new picklist will be added automatically in the “Not in module” folder or
- Layout Editor of the right module and then edit it if needed in the Picklist Editor.
An existing picklist can be activated in the module in the Layout Editor.