General
The appearance of CRM2 is defined through the Module Manager and changes made will affect the selected module. The blocks of each module can be arranged according to the user’s needs. This guide explains everything that can be defined with the CRM2 layout and how to change the layout of a module. The CRM2 layout settings affect how the information is displayed in each entity card of the selected module.
Location and layout
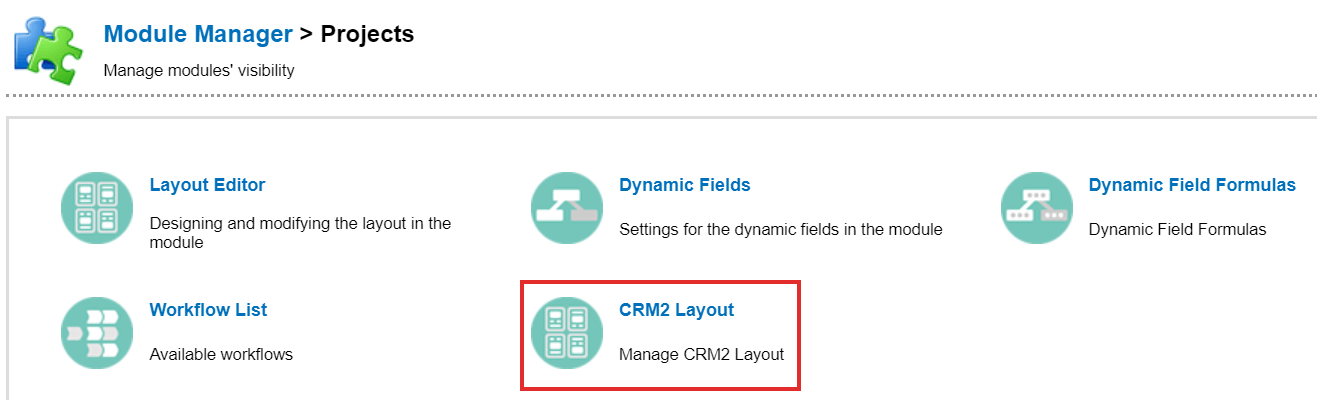
In this example, we use the Projects module, but the CRM2 layout settings can also be accessed in other modules through the Module Manager. Click on the CRM2 layout (see picture below) to access the settings.
Configuring the CRM2 Layout
When the CRM2 layout is configured, the existing layout may be available for the user to edit, or the layout may be empty. The difference between the two is what the user sees when they open the settings, so in the first step of this guide, we will assume that the view is empty (see image below). Once any information has been added to the empty layout, the view will change to edit mode, which will be explained later in this guide.
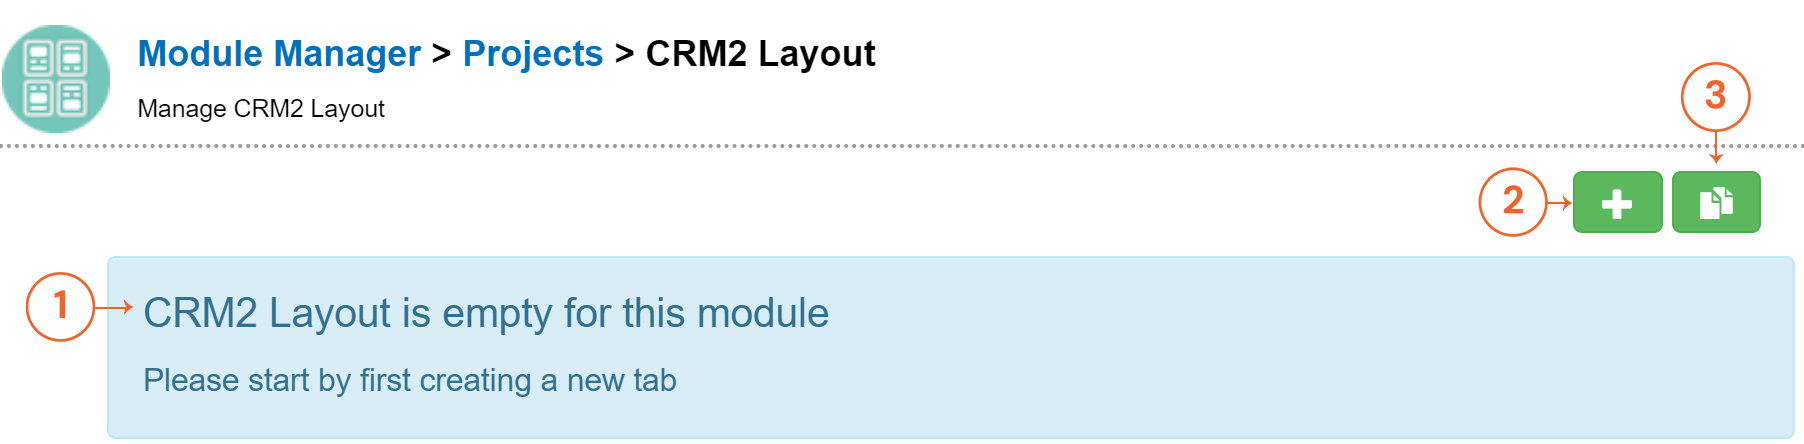
- In the place of layout tabs and their content, there is a notification instructing the person to add tabs.
- New tabs can be added by using the Plus
- The old layout of the module can be copied by using the Copy
By utilising the Plus button, it is possible to determine piece by piece what tabs are shown and which components are visible in each tab. When this option is used, every single piece of information is added to the layout one by one.
When the Copy button is used, the CRM2 layout will be copied directly from the Layout Editor settings of the module. So, for example, we are using the Projects module, and by opening the Layout Editor via Module Manager we can see that Projects have four different blocks (see picture below).
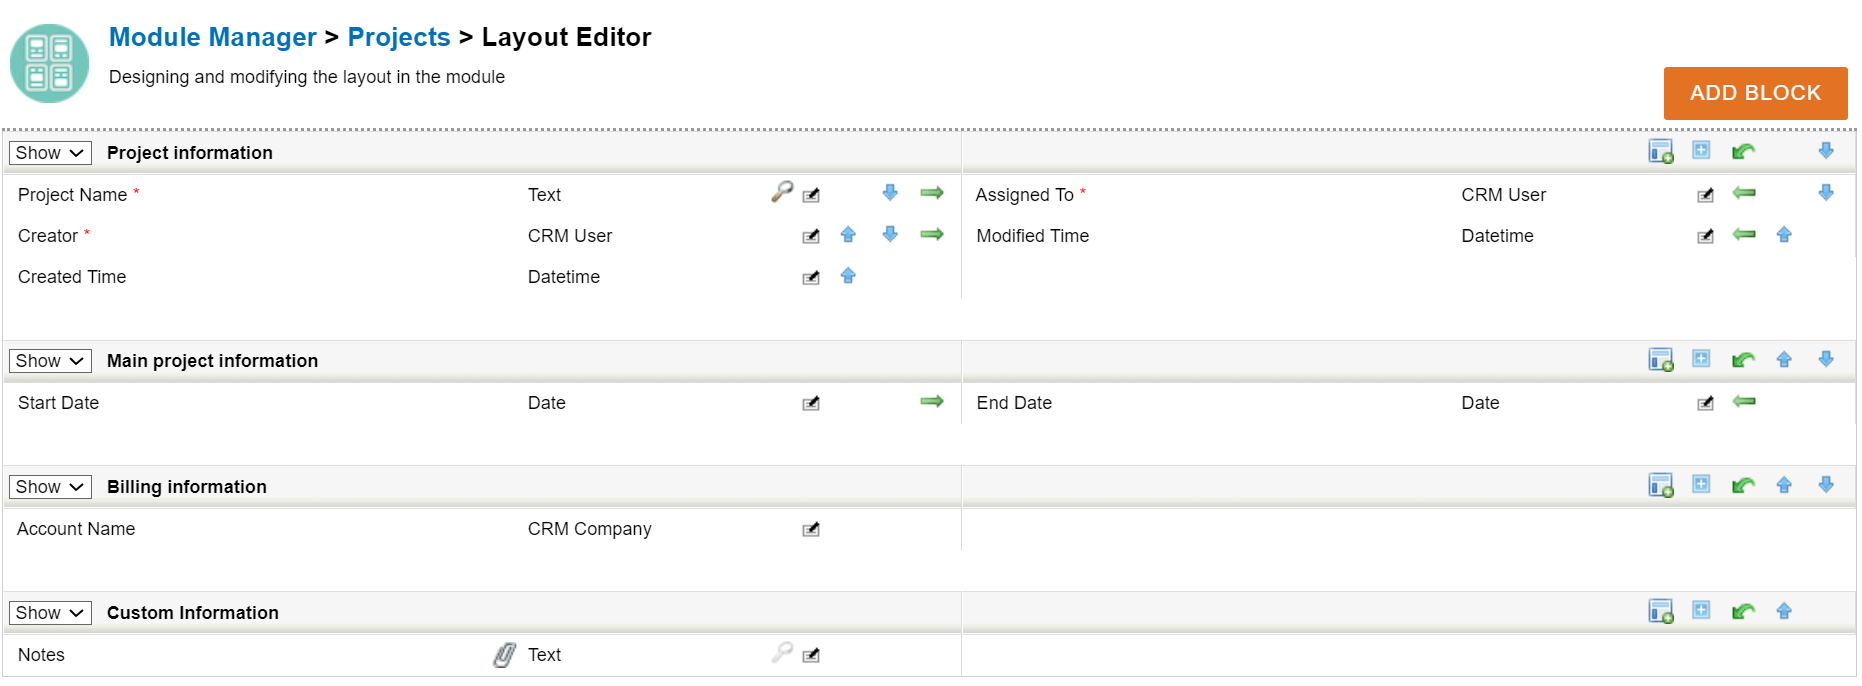
Now, if we use the Copy button to copy this layout to the CRM2 layout, we get an Edit view that shows all four blocks in the order they appeared in the Layout Editor. If the block’s Hidden option is on, the copying will automatically turn on the Is collapsed option, so the block will appear collapsed in the entity card.
CRM2 Layout editing view
Let us continue with the Edit view, which is the default view that users will see when they enter the CRM2 layout settings. Let us continue with the demonstration of the Projects module, where we have copied the old layout and now have one tab with four different blocks (see picture below).
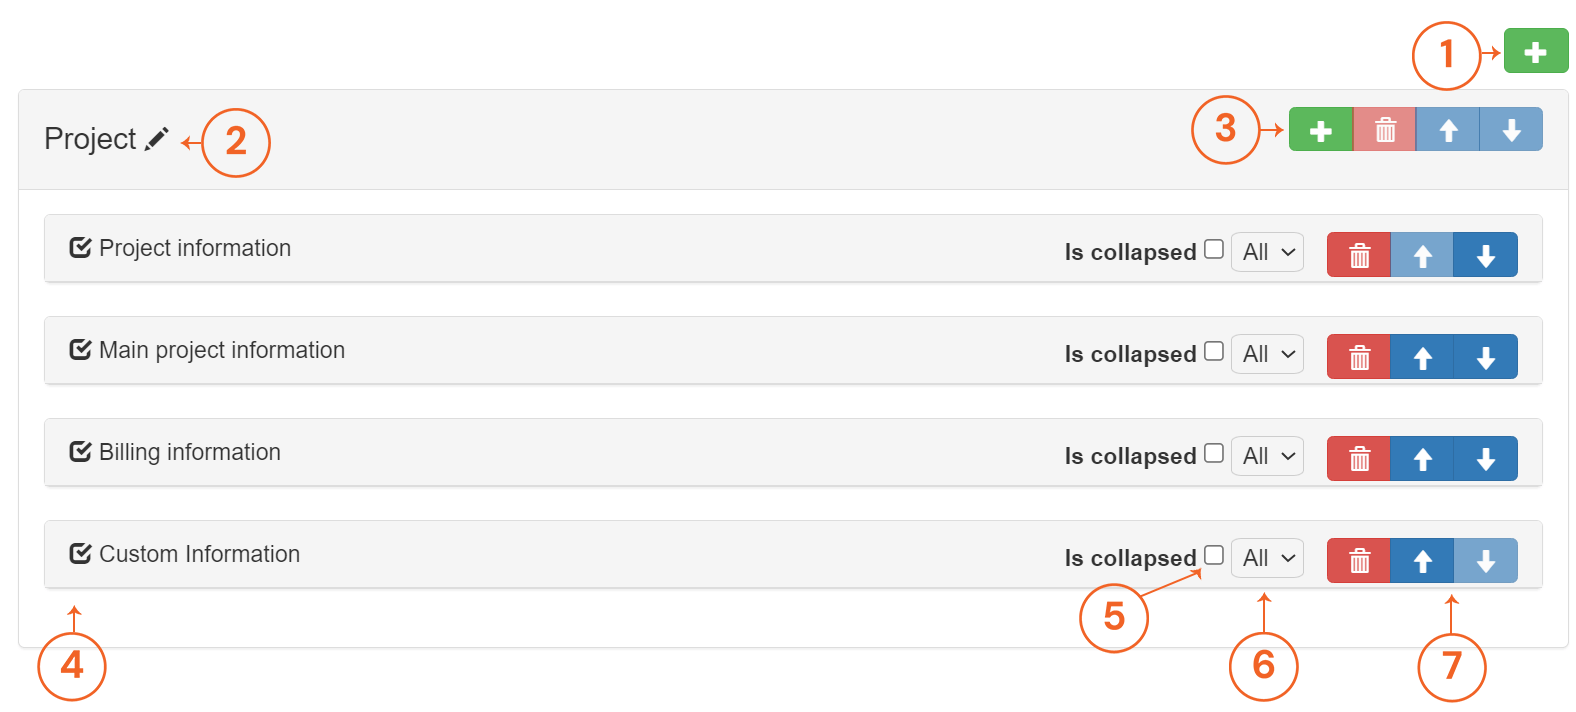
- If the layout is not empty, only the Plus button for adding new tabs will be visible in the top right corner.
- The name of the tab can be changed using the pen.
- Each tab has a control bar where the user can add new components to the tab, delete the tab if it has no components or use the arrows to change the location of the tab if multiple tabs are available.
- The name or type of the component is displayed on the left side of the view.
- The Is collapsed check box determines whether the contents of the components are fully visible in the entity card.
- Picklist controls how much information is automatically visible or collapsed.
- Each component has its own control bar which can be used to delete components or sort them to the order of the components in the entity card.
CRM2 Layout Components
By using the plus button in the tab control bar users can add five different types of components to be shown in this tab on the entity card. The default view of Adding Component popup always shows the first block of the current module, and the settings related to it (see picture below).
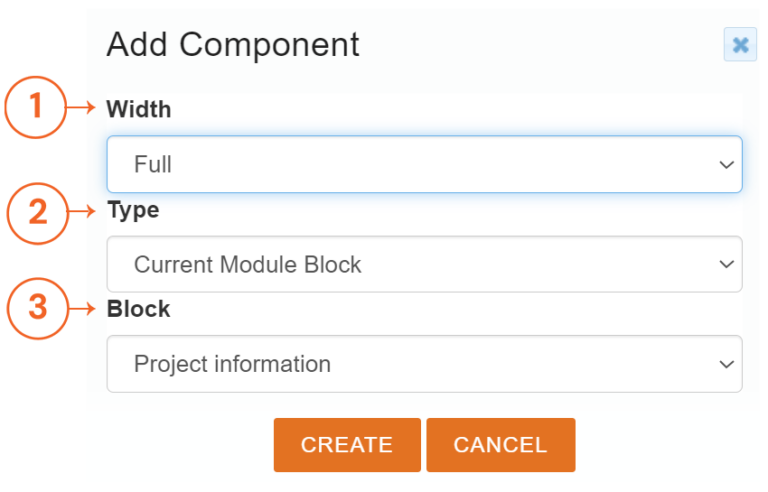
- Width of the component can be either Full or Half, and this option is always visible.
- Type of the component specifies what information is shown in the entity card, and this option is always visible.
- While Width and Type are always present, the rest of the information shown depends on the Type of the component to be added. In the example picture Type is Current Module Block, which means that the user sees a Block picklist containing all the available blocks of the selected module.
Component Width
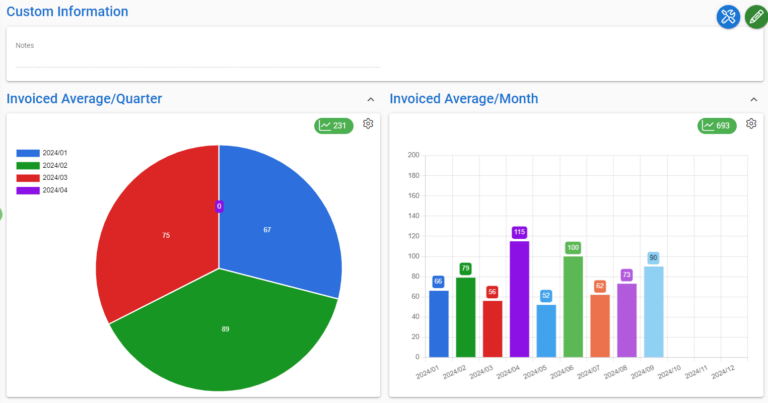
Component width is a useful setting in situations where it is beneficial to see two components side-by-side. It can also be used to display information in a more compact form. So, let’s imagine that we want to easily compare two charts in the Projects module with a single glance. We can do this by adding two half-width chart components in the Projects tab (see picture below).

In the user interface, the settings in the picture above will give the following result:
Component Types
With different components, entity cards can be customised to show diverse amount of information. Using CRM2 layout settings it is possible to add five different types of components to the layout.
- Current Module Block gives user the option to select any block that is available in the Layout editor of selected module can be displayed in the entity card.
- Related Module Block can be used if the module has related module field. For example, projects can show more information about Account related to the project.
- Custom list is used to show the Related list. These are custom lists that are created and managed via admin settings.
- Entity field change log is used to track changes made to specific field(s) of the entity.
- Entity charts are charts that are specifically created for the entities of the selected module.
Collapse Components
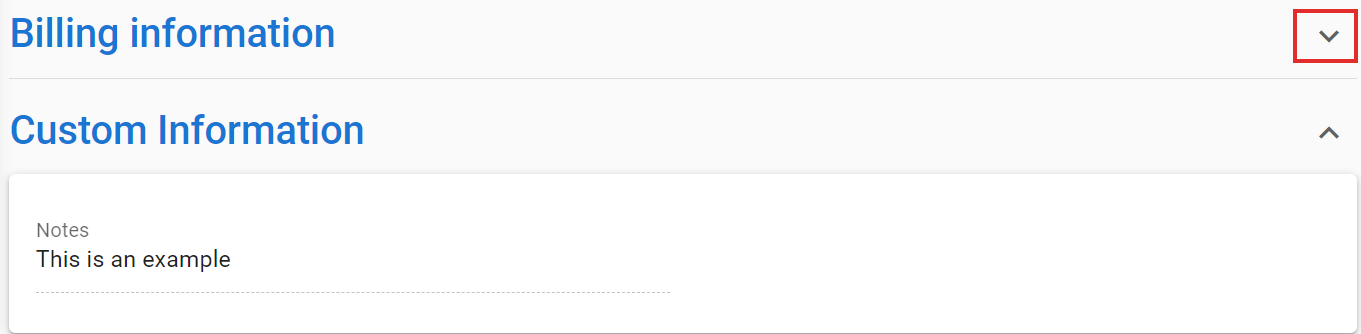
Collapsible elements can be used to keep the user interface clean and provide all the information at the same time. The information within the component can be partially or fully collapsed using various settings, so that it is only visible when the user chooses to see it. The settings used for this are the Is collapsed option and a picklist (see picture below), which control the amount of information that is displayed immediately when the entity card is opened.
![]()
If the Is collapsed option is checked like in the image above, only the component title is visible. The image below shows a comparison between a collapsed and non-collapsed block. Information visibility is toggled by using the arrows.
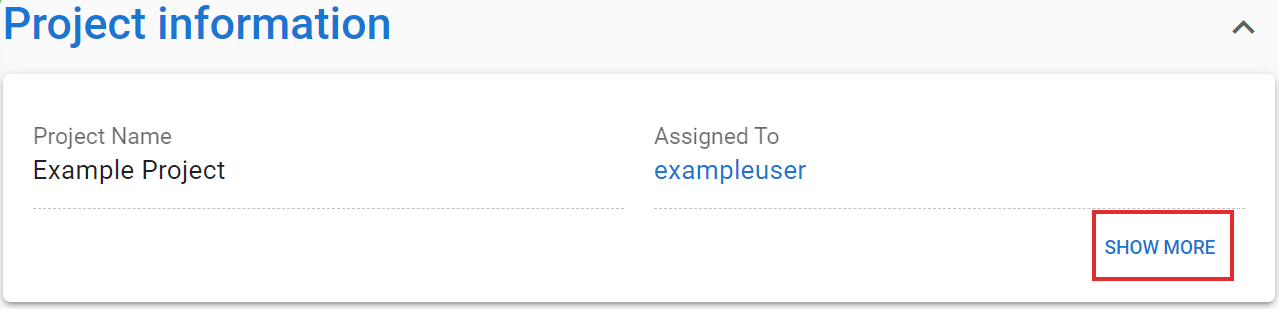
Using the picklist, the user can control how many fields the user sees before information is collapsed. Default option All displays every field of the block, but the user can select 2, 4, 6, 8 or 10 fields to be displayed. When this option is used the fields exceeding the selected amount are collapsed and they can be toggled visible by using the Show more button (see picture below).
Both collapsing options can also be combined so the user will first only see the title of the block, and then the selected number of fields while the rest is collapsed behind the Show more button.