Managing Portal Settings
Introduction
The Self-Service Portal is a portal for which you can grant access to your own customers. The modules and fields shown in the portal can mostly be managed in the CRM. Moreover, you can create several portal profiles and show them different amount of information if needed (e.g. only the main contact people of the customer companies can edit the company’s information, and the so-called normal users can only see them).
Portal Settings
The CRM Support and Self Service Portals’ profiles, fields and other settings can be managed in Settings → Portal Settings.

The main view of the settings (see the picture below) show the portals linked to the CRM. In this view, you can determine the following settings:
- Active – is the portal active.
- Email template – the email template used, when the login details are sent to the customer for the first time. (NB. All the email templates used in portal settings are created in Settings → Email Templates)
- Reset password template – the email template used, when the customer asks for a password reset in the portal.
With the row’s Edit action, you can move on to determine the modules and fields shown in the portal (more information further below).

Managing Portal Profiles and Fields Shown in the Portal
You can create portal profiles for the contacts you grant an access to the portal. With the profiles it is easy to determine, which information can be seen and edited by the contact. A new profile can be created by clicking the Add Profile button.
You must grant access to the modules and their fields to each profile separately. After selecting the profile, you can check the checkbox next to the modules, whose information should be shown in the portal (see the picture below). Remember to save the active modules with the save button at the top right corner ![]() . An unnecessary profile can be deleted with the button next to the save button.
. An unnecessary profile can be deleted with the button next to the save button.
Note: If you are activating the Products module, do note that the products are not automatically shown in the portal. To show a certain product to the customer in the portal, both the product and the contact/contact’s account must be linked to an active price book.

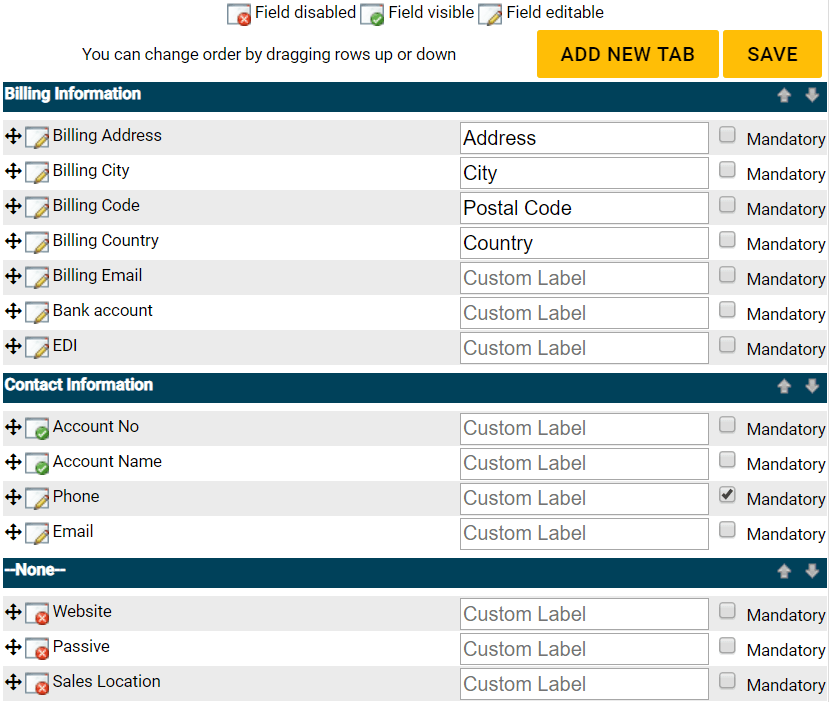
You can manage the fields shown in the portal module-specifically by clicking the Fields action (at the right side of the module’s name).
By default, the fields are not divided into tabs. It is not necessary to to use tabs, but they can be used to group the fields into different sections. A new tab is created with the Add New Tab button. The order of the tabs can be changed with the arrow buttons at the right edge of the bar ![]() .
.
The fields are not shown in the portal by default. A field is activated to visible by clicking the icon before the field’s name. Clicking the icon twice will set the field editable as well. The order and location on the tabs can be changed by dragging and dropping. You can also make a field mandatory by activating the Mandatory checkbox.
The field name can be replaced with a custom one by writing a preferred name in the Custom Label field.
