Campaign Settings and Actions in Contact Portal
In addition to the regular modules, an admin user in Contact Portal can see the Admin module, where it is possible to manage campaign settings. These include i.a. assigning the agents to campaigns, activating survey and email templates and determining tools and other settings for the campaign.
The campaign-specific settings can be accessed by clicking the name of the campaign.
Activating and Passivating Campaigns
The campaigns, that have been activated for the Contact Portal and are in active status, are shown in the default view of the Admin module. You can bring a new campaign from the CRM on the Crm tab by clicking Activate in the Actions column.
An active campaign can be passivated with the Passivate action, and the campaign will then be moved to the Passive tab. This way the campaign will not be shown on the Campaigns module and one cannot make calls for the campaign. However, the call outcomes or the settings of the campaign will not be lost and it can be activated again.
Potential Creation Tool
On the Actions tab you can create potential creation tools to copy and convert a contact in the campaign to a potential in CRM. In addition to label, description and module (Potentials), you’ll need to determine the fields whose information will be brought to CRM with the tool (see the picture below). The needed field is set Active and if you want to enable editing the field before the potential is created, check also the Editable checkbox. You can also set a default value for the field, which is used for all contacts. The potential is always automatically linked to the account and contact, so there is no need to activate these fields separately.
When the tool has been saved, it can be used immediately on the campaign’s contacts’ pages.
Activating Agents, Surveys and Email Templates
When you have selected a campaign to be edited, the Agents tab will be shown first (see the picture below). On this tab you can assign CRM users as agents for the campaign by checking the Assigned checkbox. The campaign will respectively be hidden from the agent if the checkbox is unchecked. The agents are assigned to each campaign separately, but it is possible to copy the agent settings from another campaign with the Copy agent settings from picklist.
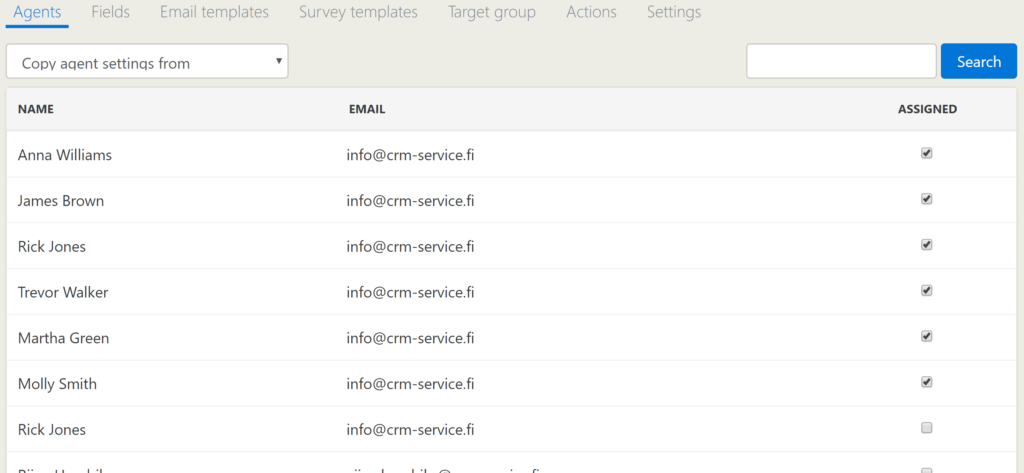
On the tabs Email templates and Survey templates you can activate survey and email templates made in the CRM for the campaign, the same way as assigning the agents.
The Campaign Fields
On Fields tab you can determine the fields shown in the campaign view and the contacts’ pages (see the picture below). New fields can be added with the Add fields button ![]() and their order can be changed by dragging and dropping. The account and contact fields shown on the contact’s page can also be set as editable by clicking the Toggle field editable button, and then the pen in the button will turn green.
and their order can be changed by dragging and dropping. The account and contact fields shown on the contact’s page can also be set as editable by clicking the Toggle field editable button, and then the pen in the button will turn green.

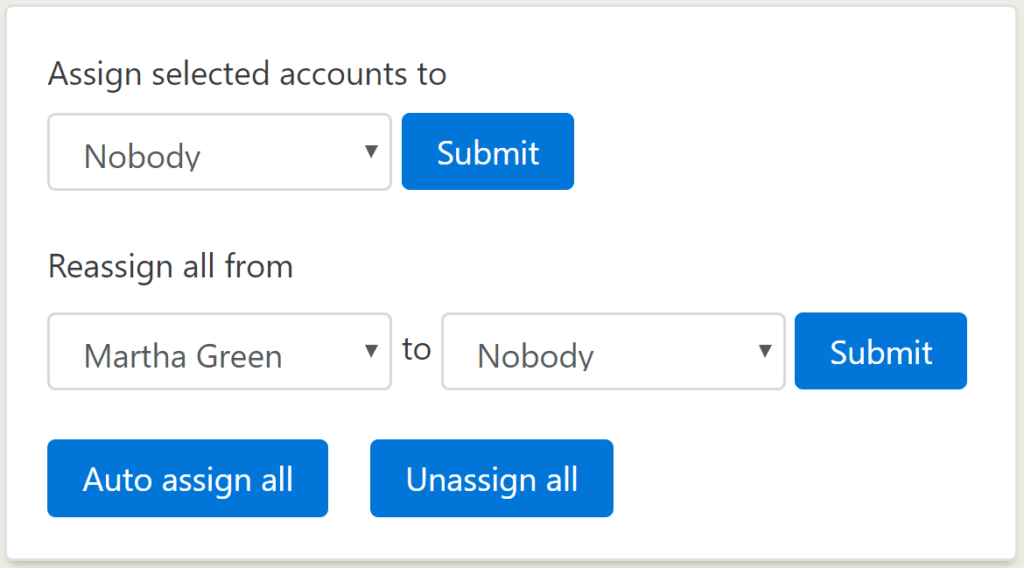
Assigning Accounts to Agents
On the Target Group tab you can assign accounts in the campaign to certain agents to enable filtering the accounts by assignee. The account can be assigned by selecting at least one contact of the account (you can also select several contacts in different accounts), selecting the assigned agent in the Assign selected accounts to picklist and then clicking Submit. All the accounts assigned to a certain agent can also be reassigned with the Reassign all from picklists. With the Unassign all button you can unassign all the accounts.
Other Contact Portal Settings
On the Settings tab you can access other campaign settings, like add and remove call results, determine the timeout for the contact editing (only one user can edit the contact at a time) and the call action.