The Menu Structure
Introduction
The main body of the system is built around the top menu. The menu is used to navigate around the system and when it is logical, it supports the daily tasks of every user. The visibility of the menu headers and menu items below them can be managed by profile. Therefore it is easy to show only the needed modules and information to different user groups.
Editing and Maintaining the Menu
The menu structure is managed in Settings → Menu Settings.
In the settings, you can add and delete menu headers and the modules listed below them as menu items (see the picture below). The changes made do not apply before the Save button is clicked.
NB: There is a section in the menu called Settings with three menu items: “Settings”, “Module Manager” and “Recycle Bin”. Under no circumstances should these menu items be deleted.
Each parent menu item is shown as a “box” – you can create a new box by clicking the separate Add ![]() button below the Save button and naming the menu item (see a note about naming below in the section Naming the Menu Items).
button below the Save button and naming the menu item (see a note about naming below in the section Naming the Menu Items).
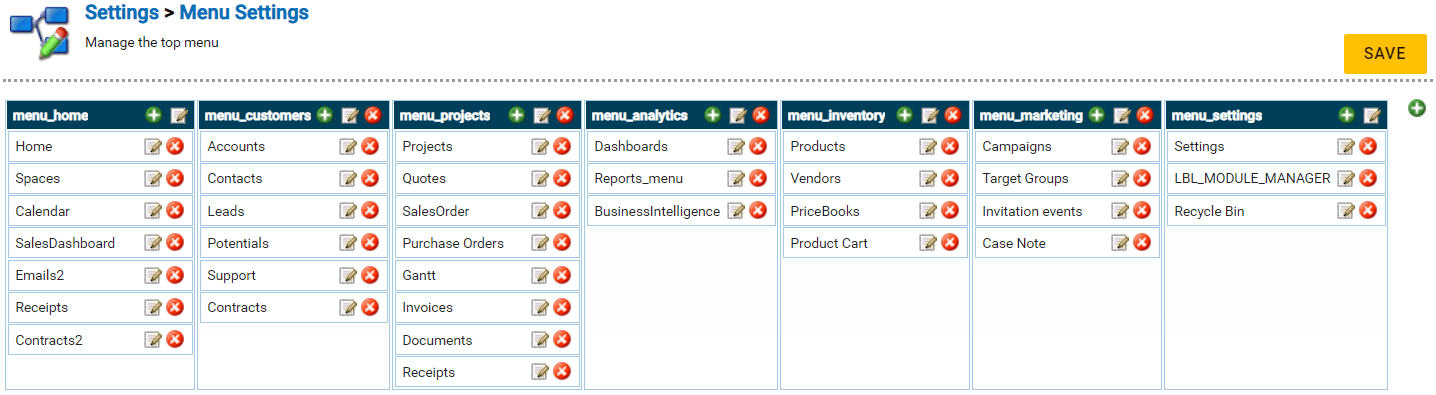
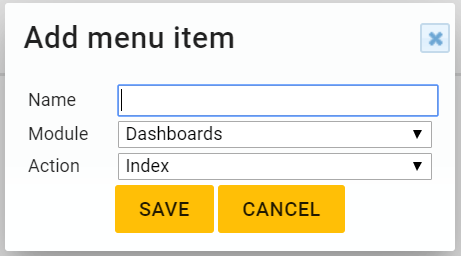
When the box has been created, the menu items listed below the parent can be added with the Add button next to the box header. The menu item is created with the following information (see also the picture below):
- Name – Name which is shown on the menu (see a note about naming below in the section Naming the Menu Items).
- Module – Module, which the menu item links to.
- Action – The option ‘Index’ is the most typical, with which the menu item will link to the list view of the module. With some modules, there are also options to create a shortcut to creating a new entity (‘Create’) or CSV import (‘Import’).
The parent menu items and menu items below them can be edited and deleted with Edit– ![]() and Delete
and Delete ![]() buttons. The exception is the Settings section and the menu items below it: they must not be deleted.
buttons. The exception is the Settings section and the menu items below it: they must not be deleted.
Naming the Menu Items
The menu items are shown by default with the name written on the Name field. This works well if the CRM is used with only one language, but when there are several active system languages, this causes problems. However, you can name the menu items distinctively so that you can easily translate them to all the languages in Global Translations (for more information, see Global Translations). For instance, in the pictures above the menu items have been named with a prefix “menu_”, and you can easily translate the right terms in the global translations.
Visibility
Not everything in the menu needs to be shown to all the users, and for example the Settings section is always only shown to the admin users. The visibility of other parent menu items can be managed by profile to show only the needed modules and information to different user groups.
When a new parent menu item is added to the menu, it can’t be seen by the users until the menu item has been activated for the right user profiles. You can do this in Settings → Profiles by selecting the wanted profile. In the profile’s settings, there is a section Menu visibility, where you can activate all the menu items the users with the profile should see (see the picture below).
The menu structure is managed in the menu settings but its visibility is managed through profiles. When a new menu item is created, it becomes visible only after it has been activated for each required profile separately:

If the settings are not taking affect in the system right away, it might be necessary to recalculate the system sharing access rights (Settings → Sharing Access → Recalculate button).