General
The Mail Scanner function can create HelpDesk support tickets to CRM from the emails received by a certain email account. With scanner conditions and actions, it is possible to identify the emails that should be scanned and perform the right actions to create the tickets. When the scanner is up and running, it is also possible to reply to the customer’s ticket and have the reply to be sent as an email reply.
Creating a New Scanner
NOTE! Using the Mail Scanner with a Gmail account requires certain settings to be enabled. Follow Google’s instructions for these settings. Depending on your Gmail settings, you may have to do multiple adjustments to get the settings right.
Once the email is scanned, it will automatically become read. The views in the example images may differ from the user’s view, as the final appearance always depends on the system. For example, different email addresses give a different rule view, because the view is dependent of the folders used by the email address account which is scanned.
Regardless of which account you plan to use, Mail Scanners are can be managed on Settings → Mail Scanner.
By default, there are no scanners in the system. A new scanner can be added by clicking the Add Mail Scanner button. The new scanner requires the following information:
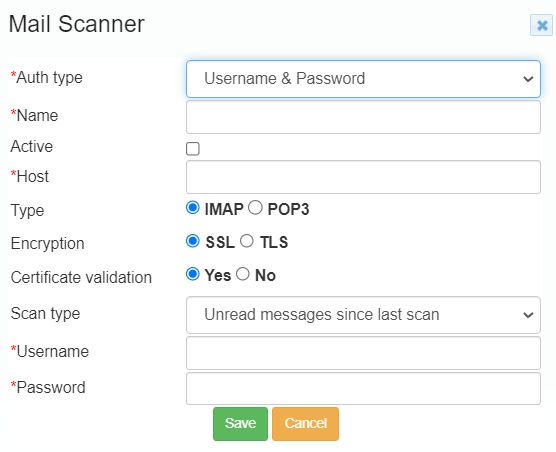
- Auth type – Username & Password or Microsoft Oauth. Microsoft Oauth instructions are below.
- Name – This is shown only internally in the CRM and does not affect the operation of the scanner.
- Active
- Host – The server name of the email account. This depends on the email provider you are using and might require some internet searching.
- The host (IMAP) for Gmail is usually imap.gmail.com.
- Type – The protocol which is used to access the email – IMAP is recommended.
- Encryption – SSL or TSL encryption.
- Certificate validation – It is recommended to switch this on.
- Scan type – The selection for which emails are scanned, only the unread or all the emails since the last scan.
- Scanned emails will automatically change to read emails.
- Username and password –The email address and password for the email account used.
When the information for the scanner has been filled clicking the Save button will create the scanner. The scanner is not operational right away, since it needs to be activated separately. It is recommended to determine the conditions and actions before the activation.
Creating a new scanner using Microsoft Oauth authentication
Microsoft Oauth authentication gives a slightly different view from Username & Password authentication:

The first fields of Microsoft’s Oauth work in the same way as when Auth type is Username & Password (see above). The host (IMAP) for Outlook 365 is usually outlook.office365.com.
The email address in the Mailbox name is the address from which emails are to be read. This does not have to be the same as the Authorized email -address, as long as the authorized address has access rights to the address in the Mailbox name -field.
If the account(s) is already connected to the Mail scanner, they are shown here and they can be easily activated by selecting the desired account by ticking the circle next to it as active. You can also click the Make new authorization -link. After that, you go to the Microsoft login and after a successful login, the authorized email will appear in the list for selection.
Pressing the Save button creates the scanner, but does not start the scanner yet. Next, you should define the conditions and functions of the scanner before activating it.
If you are already logged in to Microsoft Account with your browser, the system performs the Microsoft login automatically. So make sure that the Microsoft account open in the browser is the one you want to authorize. If the account to be authorized does not have rights to the address in the Mailbox name -field, the system issues an error message “Couldn’t connect to imap server”.
Setting Up Conditions and Actions
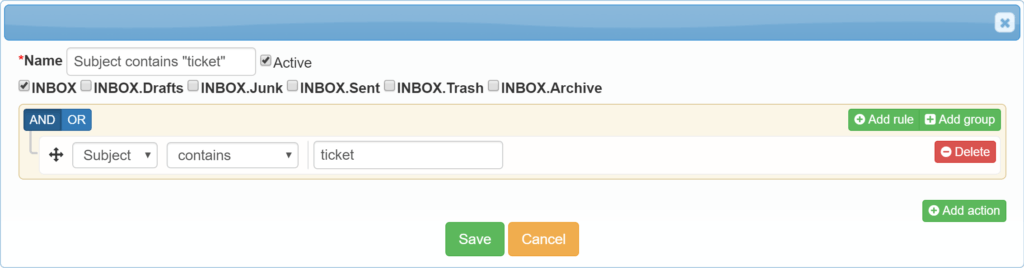
When a new mail scanner has been created, it can be run, activated, edited and deleted with the buttons in the Actions column (see the picture below). There are two buttons for editing the scanner: with the Edit button you can access and edit the information determined when the scanner was first created (see the section above). By clicking the Rules button you can determine conditions and actions for the scanning.

A new condition is created by clicking first the Rules button and then Add scanner rule. You will first need to give the condition a name and set it active. Next, you’ll need to select the appropriate email account folders, whose emails will be dealt with according to the condition(s) (see the picture below). The view may differ from the example picture since it depends on the folders of of the mailbox which is scanned. Finally, the actual condition(s) is(/are) created by clicking the Add rule button and determining an email field, operator, and value. The conditions can be grouped and ordered the same way as the conditions in the report generator and they can be either in AND or OR relations with each other.
The rule should also include one or more actions. The actions are performed in the order they are added. You can add a new action by clicking the Add action button and selecting a suitable action from the following:
- Create contact if not exists – The scanner checks whether the sender of the email is already as a contact in CRM, and if not, it creates them. If the action “Create or update ticket” is performed after this, the contact is then linked to the trouble ticket.
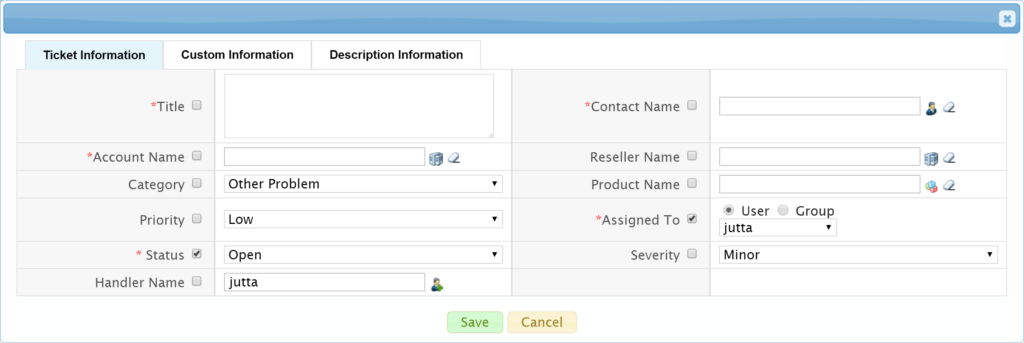
- Create or update ticket – Creates a new trouble ticket or updates an existing one with the same subject field. This action requires some configuring: by clicking the Edit button (see the picture below), you can activate the fields that are updated when the ticket is created/updated (see further below). The regex field determines what the scanner is looking for and can usually be left untouched.

- Move to folder – Moves the email(s) to the wanted folder. The name of the folder must be determined in the field that appears next to the pick list.
- Delete message – Deletes the email(s).
The picture below demonstrates a configuration made for a “Create or update ticket” action – all the tickets created will have an ‘Open’ status and a certain assignee. The Account and Contact name fields do not need to be activated, since the scanner automatically identifies a contact by their email address and links both the contact and their account to the ticket.
After the conditions and actions have been determined, remember to Save them. The scanner can now be activated and run for the first time.