Editing and Dividing the More Information Tab
Introduction
Every entity in every module in the CRM has a More Information tab. By default, this tab shows information about other modules’ entities that are linked to the particular entity: for instance the More Information tab of an account could show all the invoices (and contacts, activities, etc.) of that account. The view on More Information tab is often also called the 360° view, since it shows all that is happening around the entity.
Each More Information tab has permanent views by default. Depending on the need at hand, sometimes these views should need a little editing (e.g. not all the information in the table is needed, or the whole table is unnecessary), or it might be more useful to have the views divided into several separate tabs instead of just one. This guide will tell you how.
In addition to just editing the permanent views, you can also create custom views to the More Information tabs. For more information, see Related Lists.
Editing the Permanent Views
The settings of the tabs are managed in Settings → Information Tab Settings.
The module, whose tabs need to be edited, is selected in the picklist at the top left corner. Each view on the tab is presented as a separate row and their order can be changed by dragging them up or down the list (see the picture below).
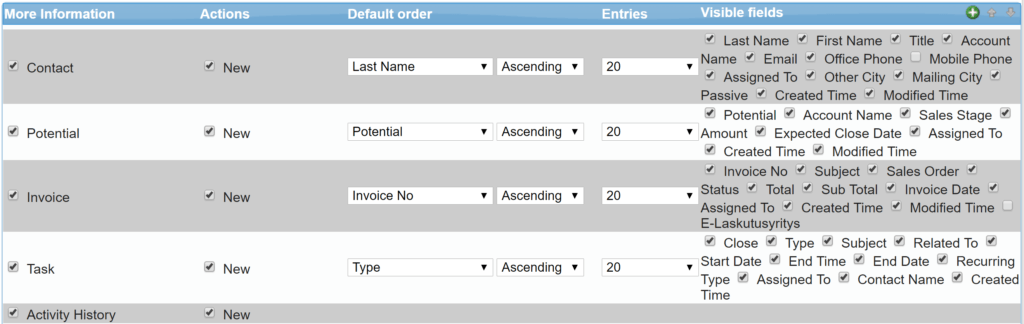
At the left edge of the row there is a checkbox, which determines the visibility of the whole view on the tab – unchecking this checkbox therefore hides the whole view from the tab. You can also hide only single fields shown by unchecking the checkboxes in the Visible Fields column.
Certain permanent views also have one or both of the following checkboxes in the Actions column, which can be checked or unchecked to activate/deactivate the function:
- New, which enables a button for creating a new entity (e.g. in an Invoice table, the button would create a new invoice)
- Select, which can be used to creating a new link between the entity in question and the selected entity.
The order of the listed information can be changed in the Default order column by selecting the field the ordering is based on, and selecting an ascending or descending order.
NB! If you make any changes, remember to save the tab using the Save button at the top right corner to keep them.
Dividing the Tab
The More Information tab and the views shown on it can be divided into several separate tabs. You can create a new tab by clicking the Add new tab button in the top right corner. When a new tab has been created, the views on the More Information tab can be dragged to the new tab (see the picture below). The tab must then be saved for the changes to apply.
A tab can later be deleted by moving the views on it to the More Information tab or any other tab. When the tabs are saved, the empty tab will be removed automatically.
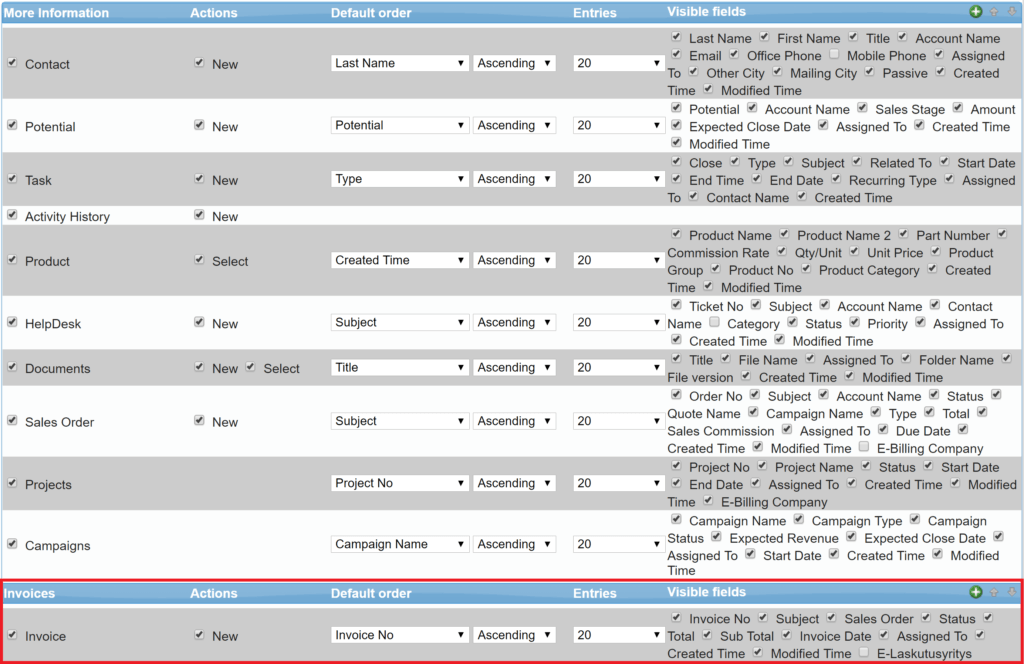
When the tab has been divided into two tabs, the new tab will be shown on the module entities’ tabs (see the picture below).
![]()