General
The Whiteboard designer is a visual Kanban-style view on the dashboard. It allows users to drag and drop entities added from one module to the whiteboard according to their needs.
The whiteboard is a versatile planner that can be used for visualizing ideas, situation overviews, teamwork, and project management. The whiteboard can be used, for example, for task management, where columns represent different task statuses, such as “Not started,” “In progress,” and “Done.” Completed whiteboards can also be shared with other users via the shared dashboard.
This guide covers the special features related to using whiteboards. For the basics of elements placed on the dashboard, see the guide Home page elements. For more information on general dashboard management and sharing dashboard views, see the guide Dashboard management.
Quick start guide
- Open/create the desired dashboard view.
- Select Add new element.
- Set the element to Whiteboard and give it a name.
- Select the module from which the entities are retrieved from the drop-down menu and save.
- Add the desired columns to the whiteboard.
- Add entities to the desired columns using the Add button.
- Move the added entities freely between columns using drag and drop.
Whiteboard parts
Users can create whiteboards from all modules and entities they have permission to view. A whiteboard consists of the following parts:
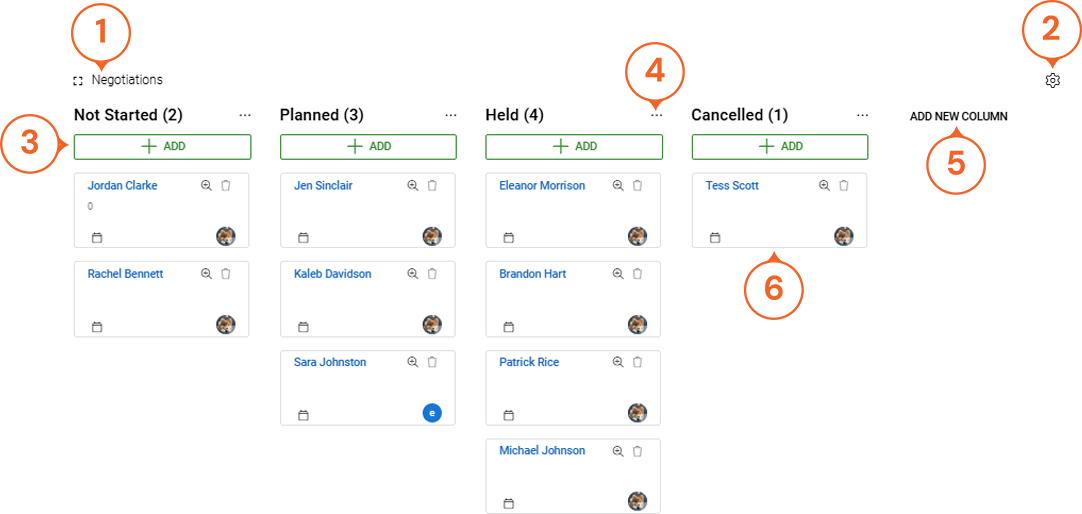
- The upper left corner of the element contains the whiteboard title and a button that opens/closes the entire screen.
- The whiteboard settings are located in the upper right corner. In the settings, the whiteboard can be renamed or deleted.
- Entities can be added to the columns by clicking the +Add button under the column header. The number to the right of the header indicates how many entities are in that column.
- The settings for an individual column can be accessed by clicking the button with three dots next to the column name.
- New columns can be added to a new or existing whiteboard using the Add new column button.
- Entities added to the whiteboard are stored in their own boxes, which can be easily moved between columns using drag and drop.
If there are many entities in a column on the whiteboard, a scroll bar appears on the right side of the column. In addition to the scroll bar, the entities in a column can also be scrolled up and down using the mouse wheel. If the number of columns exceeds the width of the whiteboard, a scroll bar appears at the bottom of the whiteboard. The bar can be used to scroll the columns sideways on the whiteboard.
The column to be added is always given a name, and the addition is finalized by clicking the arrow icon or pressing the Enter key. The columns added to the whiteboard can be renamed, deleted, or moved one column to the right or left in the column settings (see picture below).
Entities on the whiteboard
Entities added to the whiteboard have their own small cards, which can be moved to the desired location by clicking and dragging the card. The entity card displayed on the whiteboard traditionally consists of the following parts:
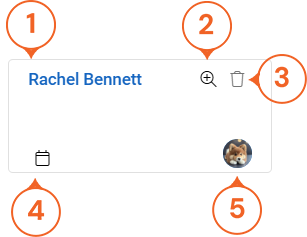
- The name of the entity is located in the upper left corner of the card. If the entity has a description, the description text is displayed below the name.
- If the module fields contain fields set for the quick view, the quick view magnifying glass icon is displayed in the upper right corner of the card.
- You can delete an entity from the whiteboard using the trash can icon in the upper right corner.
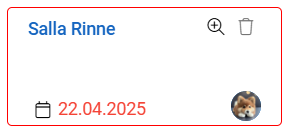
- In the lower left corner, there is a calendar icon that can be used to set a whiteboard-specific time limit for the entity.
- In the lower right corner of the entity card, there is an icon representing the user responsible for the entity.
The user can go to the entity card by clicking on the entity name. The quick view allows the user to view the fields that have been defined in the settings to be displayed in the quick view of the entity’s source module.
The trash can icon deletes the entity from the whiteboard. To prevent accidental deletions, the user is asked to confirm the deletion. If necessary, the entity can always be added back to the whiteboard using the +Add button.
The calendar icon allows the user to set a time limit for the entity. This time limit only applies to the whiteboard, and the date set here will not be visible anywhere else. If the set time limit expires, the entity card and the time limit set for it will be highlighted in red.
Whiteboard – Frequently Asked Questions
Can I share my whiteboard with other users?
The system’s admin users can create dashboard views for individual users or share them with reporting groups. These views can be used to share all elements of the dashboard, including whiteboards.
Can I edit an entity directly on the whiteboard?
The whiteboard is intended as a visual tool, so changes made to it are not saved to the entity cards. If you want to edit the entity itself, click on the entity name on the whiteboard to access the entity card.
My needs have changed, do I need to create a new whiteboard?
The whiteboard is designed to be an easily editable element, whose columns can be moved and edited according to changing needs. Creating a new whiteboard is only necessary if you want to retrieve entities from another module.
Can entities from several different modules be placed on the whiteboard at the same time?
The whiteboard is designed to display information from one module at a time. If the entities of an entity have relationships to another module, they can be displayed via the quick view. For example, the field displaying the organization of a contact can be added to the quick view, which can be used to navigate to the card of the entity in question if necessary.
Can the information on the whiteboard be updated automatically?
The whiteboard is intended to be an auxiliary element, so no automation is available for it. If you do not want to use a drag-and-drop designer, you can always create a kanban for the module you want, which will be updated automatically according to the conditions you set.
Why is the quick view button not visible on the entities in the whiteboard I created?
If the quick view button is hidden, it means that quick view has not been activated for any of the fields in the module from which the whiteboard data is retrieved. If you need this feature, please contact your system admin user, who can enable it for the desired fields.