Stock Tracking
Introduction
It is possible to keep track of the quantity of your products by setting them stock tracked. When stock tracking is activated for a product, purchase orders will increase and sales orders decrease the amount of the product in stock. You can also for example have the CRM system notify the vendor of a low stock.
Enabling the Tracking
To make the tracking possible, it is necessary to make the purchase and sales orders affect the product stocks first. This must be done by an admin user.
To make the orders affect the stocks, you need to go to Settings → Additional Settings. In the Row level functions section, there are rows Sales Order States that affect the Product Stocks and Purchase Order States that affect the Product Stocks (see the picture below). Check the statuses that should affect the stock of the products. All the other statuses will not affect the stocks: if for example an approved sales order is later set as cancelled, the stock of the product will increase by the amount of that sales order.

Setting a Product Tracked
When the sales and purchase orders affect the stocks, products can be set stock tracked. This is done separately to every product, so all the products do not need to be tracked.
First, select an existing product or create a new one by clicking the Create products… button ![]() . In both cases, you should have the product in editing mode, and then determine the following information:
. In both cases, you should have the product in editing mode, and then determine the following information:
- Is Stock Tracked (see the picture below) – When active, this checkbox sets the product stock tracked.
- Usage Unit – The unit that is used to calculate the amount of the product. The option ‘units’ is usually appropriate.
- Qty/Unit – If the product is a set of smaller parts (e.g. a set of four car tires), set the right quantity per unit. If the product is sold piece by piece – most of the products are – set the value of this field to 1.
- Qty In Demand – This field can be used to mark the demand forecast of the product. Not mandatory.
- Reorder Level – The system notifies the vendor if the product stock goes below the number given. Not mandatory.

Note: The field Qty In Stock should be hidden. In case you see it, keep in mind, that the value of this field does not affect the stock nor does it show the current stock level.
Example: Stock Tracking of Chocolate Boxes
Increasing the Stock
This example demonstrates the logic of the stock tracking. There is a product ‘Box of chocolates’ which is set stock tracked but there are none of them in the stock yet. To increase the stock, you can do one of the following:
- Edit the stock manually on the More information tab of the product (see the picture below)

- Make a purchase order.
In most cases, making a purchase order is recommended. The order is made in the Purchase Order module by clicking the Create Purchase Order… button ![]() . Then determine at least the following information:
. Then determine at least the following information:
- Subject.
- Assigned to.
- Status – The value has to be a status that affects the stock (note the remark at the end of the guide).
- Billing Address and Shipping Address.
- Item Details – See the picture below. Select the correct item name (Box of chocolates) and set a suitable quantity. The field List price is updated automatically when the product is chosen.
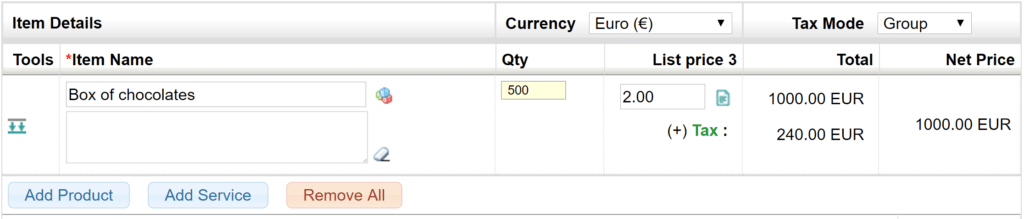
When the purchase order is saved and its status affects the stock, there are 500 boxes of chocolate in stock. They can now be sold by making Sales Orders.
Decreasing the Stock
A sales order needs at least the following information:
- Subject.
- Account name – The buyer of the product.
- Status – The value has to be a status that affects the stock (note the remark at the end of the guide).
- Assigned to.
- Billing Address and Shipping Address.
- Item Details – See the picture below. Select the correct item name and and set a suitable quantity. The field List price is again updated automatically.

When the sales order is saved, the stock of the chocolate boxes is reduced by 25. The current stock can be checked anytime on the More information tab of the product (see the picture below).

NB: The status field must be saved in the edit mode (Edit – Save) to activate stock tracking. Quick or mass editing the status field does not activate the stock tracking feature. Generally also status changes made by integrations do not trigger the feature.