General
When enabled, the entity field change log allows the system to show the changes made in the entity card’s specific field(s). Entity field change logs will show the value changes of the field, who modified the field, when the field was modified and how long each change has been in use.
Start
The admin user controls the entity field change log. This means that normal users can only view the information and they only see if they have the right to see the field change log is tracking. To enable the entity field change log the admin user must add the wanted field log to be visible using the CRM2 Layout editor.
Quick-Start Guide
- Go to the settings of the wanted module.
- Select CRM2 Layout.
- Press the plus button on the wanted tab to add a new component.
- Set width to either full or half.
- Select Entity field change log from Type picklist.
- In the Field name picklist, select the field(s) you want to track.
- (Optional) Edit the location of the component by using the arrow buttons.
Exceptions
Everything is not displayed in the change logs. Legacy functions like mass editing in legacy side and importing from legacy side are not displayed in the logs. These functions cannot be performed anymore, but because of this some historical data might be missing.
Also the custom background processes are not displayed in the change logs. If automatic processes need change log documentation the solution is to use dynamic field formulas, workflows or build by REST integrations. Changes made by these methos are displayed in the change logs with the robot icon to demonstrate that the change was done by automation.
Step-by-Step guide
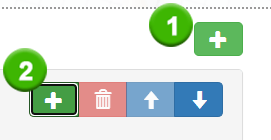
Go to the settings and select Module Manager. In the module manager, go to the wanted module and press the settings icon (hammer) to enter the module settings. Next, select the CRM2 Layout.
You will now see all the currently available tabs and their layout in the settings menu. You can now either create a new tab (1) or pick one of your existing tabs. When you have the tab selected, you press the plus icon on the control panel of the selected tab (2) to add the entity field change log component.
Next, you are presented with the Add Component menu where you can determine the settings of the wanted component. Width determines how the information is shown in the system. In this case, Type is always Entity field change log. Default field specifies which field is displayed in the entity field log first. Possible fields setting is used when there is a need to track multiple fields simultaneously using the same component.
How the information is shown in the system
After the setup is done, the information will be available in the selected tab of the entity card that is located in the selected module.
Width
The style is determined by the width of the element. Full-width setting lets the element fill the whole screen from left to right, but half-width only takes 50% of that space, allowing you to put two elements side-by-side.
Every tab consists of four parts. Value tracks the changes made to the value of the field. If the value is empty, it means that there has been no value in the field at the time. Modified by column shows the user who made each change. If the user has a picture in the system, the image will be shown in this column. If the change is made by the system automation, the column will show a robot icon.
Modified at column shows the time change was made. Duration shows how long the change has been in effect. The timer on the most recent change will continue recording the duration until a new change is made for the field. The most recent change is always shown in bold.
Monitoring multiple fields in the same component
To make things more compact the Possible fields setting can be used so multiple fields can be tracked inside the same component. This can be done in the creation process explained above, or you can edit the existing entity field change log by using the pen icon, which is located next to the component name
After possible fields are added, the component will show a Select target picklist. Using the picklist users can easily switch between fields to see the change log of the field they want.