General
A dashboard is a place where users can place elements, also called widgets. Users can have multiple dashboard views, and they can also be shared with the reporting group. The dashboard provides users with a quick view of things they like to follow, and it is a place for specialised elements like a widget used in work-hour reporting.
Location and layout
Dashboard view differs from other modules in that it is permanently located under the Home menu (see example picture below), and it cannot be relocated using the settings. This is the module that automatically opens when the user logs in to the system.

Dashboard management
On the top of the dashboard view, you can see three main buttons that open the dashboard controls (see picture below).

- The dashboard Menu button shows the name of the active dashboard and opens the dashboard control panel.
- With the Plus button users can create new dashboards.
- The Pen button allows users to edit the currently active dashboard.
Dashboard control panel
When entering the dashboard control panel by clicking the dashboard menu button, the user is given a menu that contains all their dashboards (see picture below).
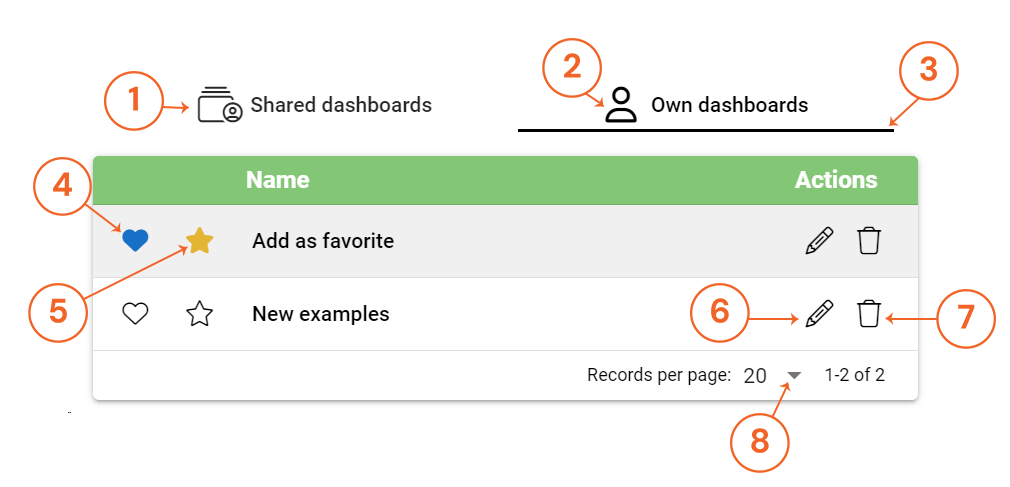
- Shared dashboards tab has all the dashboards shared by the user or shared with the user.
- Own dashboards tab has all dashboards owned by the user that are not shared with anyone.
- Currently active dashboard tab is represented by a black underline.
- Heart icon is used to add/remove favourite dashboards.
- Star icon is used to set up the current default dashboard.
- Using the Pen icon user can edit the dashboard.
- Trashcan icon is used to delete the dashboard.
- Users can get more or less dashboards in the view by using the pagination selection.
The dashboards are listed in alphabetical order. All users must have one default dashboard selected using the star icon. This default is the dashboard opened when the user logs in to the system and default is shown in case there is no active user selection.
Favourite dashboards
Each user can have 10 active favourites. Added favourites will appear as tabs next to the dashboard menu button, and if needed user can browse them by using the arrow buttons (see picture below). The active dashboard has a black underline and the tabs are shown in the order favourites are added using the dashboard control panel.

Note: If the dashboard’s name is changed, the name in the favourite bar might still show the old name. To refresh this, the user just needs to press the heart icon of any dashboard (for example, favourite and then unfavourite one), and all the names of the favourite dashboards are refreshed.
Adding and editing dashboards
When the user presses the Plus button to add a new dashboard, they are given a pop-up window to get them started (see picture below).

- Name the new dashboard here.
- Activate the slider to share the dashboard with selected reporting group(s).
- Cancel by pressing X.
- Finalise by pressing Save.
When the user wants to edit the dashboard, they can access the Edit dashboard popup window by pressing the pen icon in the dashboard control panel. The pop-up is identical to the Add dashboard popup, so the user can adjust the same options in the editing view.
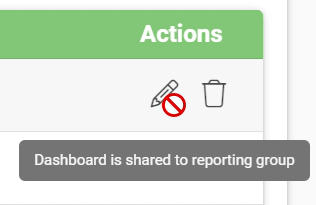
If the user has no permission to edit the dashboard, like for example edit the dashboard that is shared with them, their mouse cursor changes to a block icon and an explanation is given (see picture below).
Sharing the dashboard
Sharing the dashboard is easy and can be done in both add/edit dashboard views (see picture below). 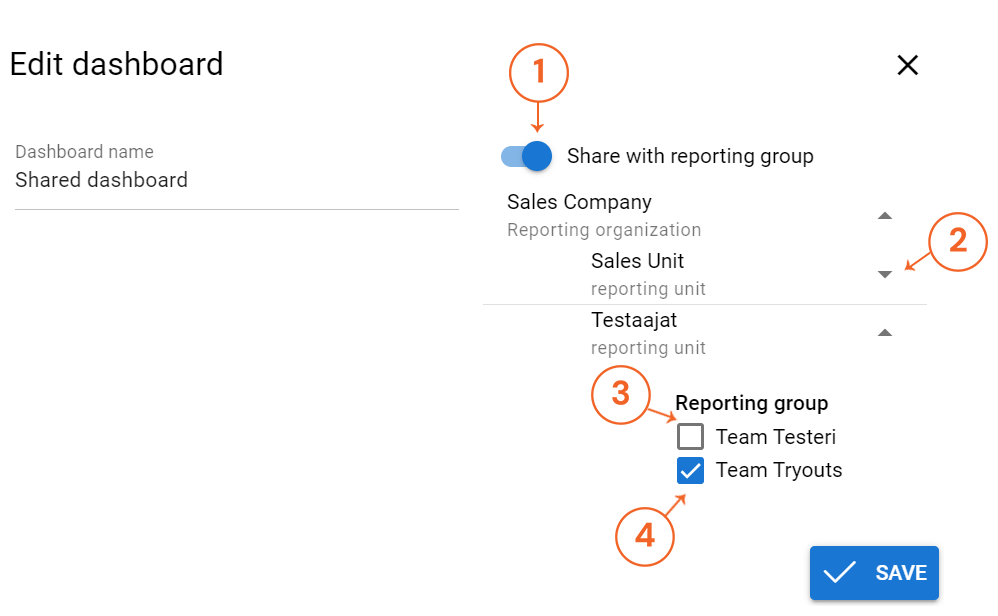
- Start sharing by activating the Slider.
- Use arrows to expand/minimise menus to find the right reporting group(s).
- An unchecked box means the dashboard is not shared with the reporting group.
- The checked box means that the dashboard is shared with the reporting group.
The same dashboard can be shared with multiple reporting groups inside different reporting units, allowing the wide spread of information when necessary.
Creating a dashboard for another user
For Admin users, it is possible to create a dashboard for an individual user rather than a group of users. The process still starts with creating the dashboard normally with all the desired elements and settings. When the dashboard is ready, simply use the pencil icon on the desired dashboard to edit it and select the desired user from the Move dashboard to another user drop-down list (see picture below).

This option can be used for all old dashboards, meaning that Admin users can also transfer existing dashboards from one user to another. Dashboards are not copied when this method is used, so once the transfer is complete, the dashboard will not be available to the user who previously owned it. The exception to this rule is admin users, as they can see all dashboards. After the transfer, if the admin user was the original owner, the dashboard will move from the Own Dashboards tab to the Other Dashboards tab.
Dashboard elements
Dashboard elements can be added in the dashboard editing mode, which is opened by selecting the pen icon from the dashboard view. When the pen icon is pressed, the add/edit icons will change and new buttons will appear (see picture below).

- The add new element button allows user to add different elements to their dashboard.
- The checkmark button is used to save and finalise the dashboard edits.
By pressing the Add new element button user can add multiple different elements on their dashboard. These elements have nine main types, and they are selected from the picklist (see picture below).
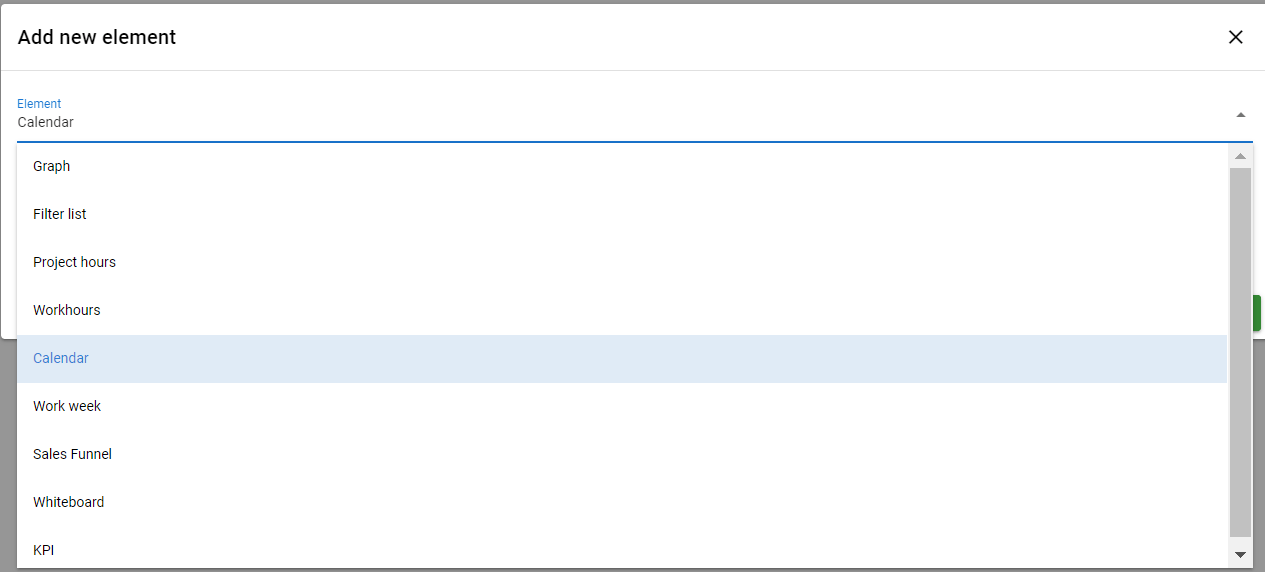
Depending on the type of the element selected, different settings are added. You can read more about the different types of home page elements here.
Editing dashboard elements
By default, the new dashboard element is placed after the existing elements on the page. Elements can be moved by clicking and dragging the element to the wanted location. All elements have a gear button for settings (see picture below) that allows renaming and deleting the elements.
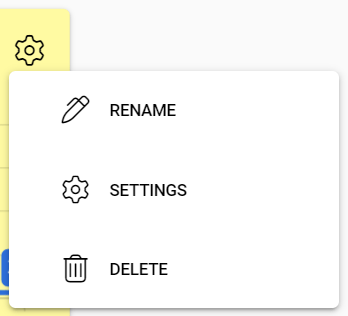
Depending on the element the user can adjust the specific settings of the selected element as well, meaning that there is another gear icon revealed after the first gear icon is clicked.
Saving the changes
The system saves all the changes to the dashboard automatically when the user exists in the editing mode. The dashboard tracks and saves the changes made in the editing mode automatically, so in most cases, changes that are made are not lost even if the user accidentally exists from the dashboard editing mode without saving.
However, please note that leaving the dashboard without exiting the editing mode may cause the loss of current edits, so it is recommended to exit the editing mode before leaving the dashboard. It is also good to note that autosaving changes also mean that if an unwanted element is added to the dashboard, it should be manually removed instead of just exiting the dashboard view without saving.