Managing IP Permissions
You can manage IP permissions in Settings → IP Permissions.

If there aren’t any permissions (denied or allowed IP addresses) determined, the system will allow signing in from any IP address. By default, the system allows only CRM service provider’s IP addresses whose types are Permanent.
Every change in permissions (creating, editing and deleting) leaves a mark in the database, where the CRM service provider can check the changes made.
You can create a new permission by clicking Add new IP button. When you create or edit permissions, you’ll have to determine the following configurations:
- IP Address: An individual address, wanted range of addresses or an IP address + mask.
- IP Address Type can be either IP, IP Range or Subnet. IP means defining an individual IP address, with Range you can define a range of different IP addresses and with Subnet you can make subnet mask definitions.
- Allowed users can be flagged either as Deny, Normal or Normal + Admin. Deny forbids a specific IP address/range, Normal allows signing in by normal users and Normal + Admin allows normal users and admins.
- Description is shown in the list view.
- Assigned owner is the owner of the permission. You can select a user in the picklist. When a user has been selected, the responsible user email will also update, though it is possible type in another email address.
- With Active selection you can define if the permission is active or not. If the permission is not active, it will not be involved in the IP address checking system.
- Duration of the permission is Always on by default, but it is also possible to define it for a specific period between two dates or using either the beginning or ending date and leaving another field empty.
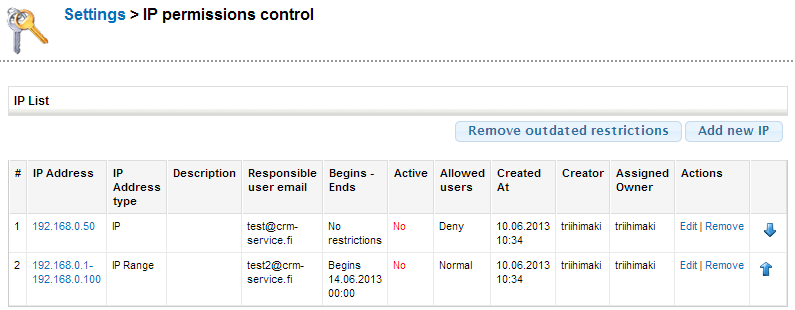
IP permissions list view
Created IP permissions’ details are shown in the list view. There are also Edit and Remove buttons for every permission. Removing a permission will delete the rule from the list and after that you cannot edit it and it is not valid anymore.

At the right hand side there are arrow buttons to configure the permissions’ order. When signing in, the first permission that matches the IP address will overrule the others.
You can define for example that the range of 192.168.0.1 – 192.168.0.100 is denied, except for 192.168.0.50. This is done by first determining a rule that denies (Allowed users: Deny) every IP address which is in the range of 192.168.0.1 – 192.168.0.100. After this you must add a separate permission for the address 192.168.0.50 on which you set to allow e.g. Normal users. In this case, the only allowed IP address has to be moved above the denied IP ranges, because it will allow the access when IP 192.168.0.50 connects (if the rules are in different order, the access won’t be granted). IP address 192.168.0.11 cannot use the system because the second rule denies it.
Web Services use a separate permission management. Permission is granted to each Web Service method by separate API keys.
