General
This guide is about defining module tools’ parameters and other possible tool-specific settings. For more information about the module tools in general, see the guide Module Tools.
Parameters
You can set parameters for the module tool to for example fetch/supplement information from the source entity or fill in the field with certain information:
- The formula for parameters when fetching information from another module: target field={$source field} (e.g. cf_1103={$cf_1499}).
- The formula for parameters when fetching information from the same entity: target field=the wanted value/text (e.g. in a picklist: cf_1548=Approved OR in a text field: cf_5823=This is an example).
When writing the parameters, in some cases it is important to take into consideration the module, that the module tool is created into. E.g. if you are creating a tool for the Accounts module, which creates a new contact for an account, the link between the account and contact is made with the parameter account_id={$ID}. Whereas when you are creating a tool for the Contacts module, which creates a new potential for a contact, the link to the contact’s account is made with account_id={$account_id}.
There are examples of using the parameters below. For clarity, they all have been written for “Link to other module” module tools, but the parameters work the same way in any other module tool you can write parameters for.
You can find more specific parameters after the examples.
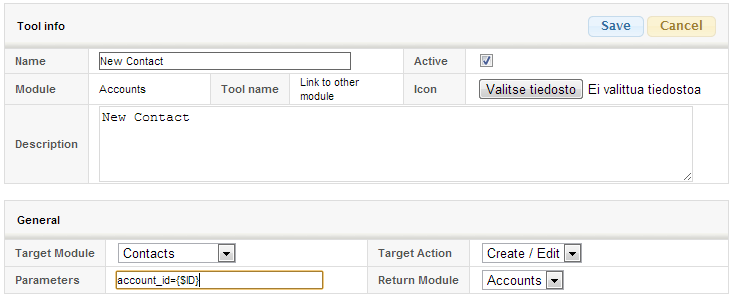
Example 1: Creating a tool for the Accounts module that creates a new Contact for the Account (by linking the Contact to the Account with a parameter account_id={$ID}, see the picture below).
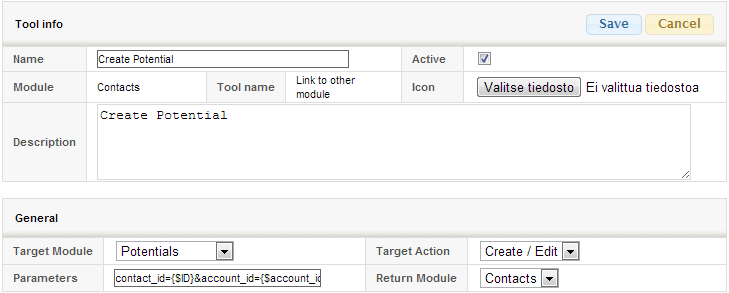
Example 2: Creating a tool for the Contacts module that creates a new Potential for the contact (by adding an account relation and a contact relation to the potential with parameters contact_id={$ID}&account_id={$account_id} , see the picture below).
Dynamic formulas
Dynamic field formulas are available in the module tools Link to another module and Update entity.
How to make dynamic field formulas can be found here: Examples of dynamic field formulas.
Converting a quote/sales order into a sales order/invoice (Link to another module)
The rows of the quote/sales order are copied to the sales order/invoice with the following parameter:
copy_inventory_rows_from={$ID}
Rows in a specific status can be copied to a sales order/invoice by combining the copy_inventory_rows parameter with another parameter, condition_rowstatus. For example, if you only want to include rows whose status has been left blank on the invoice, you would use the following parameter:
&condition_rowstatus=empty!
Create an activity from another module (Link to another module / Create event or task)
When you want to associate an activity to be created with an account, e.g. an account specified in the output module, the parameter must be of the form accounts[]={$account_id}. In the example below, an event-type activity is created in the Contacts module with a customer and a contact attached.
accounts[]={$account_id}&contacts[]={$ID}
Copying the activity (Link to another module)
If an activity is to be copied using the module tool, so that the client and contact links of the original activity are also copied, the following parameters are required:
copy_relation.accounts={$ID}©_relation.contacts={$ID}
NOTE! Internet browsers generally recognize the © entry as a copyright © and may sometimes replace this entry with this character. This will not be encountered when creating a module tool, but if it is ever necessary to edit and re-save the module tool, please ensure that this entry has not been changed to a copyright mark. If this is the case, the situation can be corrected by manually rewriting the © entry.
Copying the sub-event when copying the mass event (Link to another module)
When using the template for mass events and you also want to copy the sub-events of the mass event, use the following parameters:
copy_mass_event_sub_events_from={$ID}
Copying a survey when copying a mass event (Link to another module)
When using the template for mass events and you want to copy the mass event survey as well, use the following parameters:
survey={$survey}
Copying survey in the Surveys module
When using the module tool to copy survey inside the Surveys module, following parameters are used:
options={$options}
Copying single relation from multi-relation
When there is a need to copy a single relation from a multi-relation, parameters are added in a style of <relation_id>.single. For example, suppose there is a need to create potential from an activity while transferring Account and Contact from the activity to the Potential. In that case, the parameters are written like this:
account_id=account.single&contact_id=contacts.single
Create entity module tool parameters
It is possible to create a module tool for creating entities as well. However, it is essential to keep in mind that when utilizing the tool to copy data from other entities, the parameters must include the prefix “rel_”. So the parameters could look like this, for example:
firstname={$rel_firstname}&lastname={$rel_lastname}&email={$rel_email}
Adding relations to activities
Sometimes there is a need to create different relations to entities created with the entity creation tool, such as activities.
Here a parameter called related_ids[]
For example:
related_ids[]={$ID}
This can be used for all relations. For example, if you want to create an activity in the workflow when you save a ticket, you can use the following parameters to add a relation to customer, ticket and contact for the activity:
activity_mode=Events&related_ids[]={$ID}&related_ids[]={$rel_accountid}&related_ids[]={$contact_id}
Note! When creating activities, it is important to specify the type (in example above, we are creating event using parameter activity_mode=Events).
Copying project phases
The project is copied using the module tool Link to other module. If you want to copy the project phases when copying the project, use the following parameter:
project_rows_from={$ID}
Custom Save Buttons
In Link to other module tool, you can define custom save buttons that update fields when the entity is saved. These buttons are shown at the bottom of the save view, next to the default Save and Cancel buttons.
Custom save buttons are defined in the Parameters field.
The module tool must be created in the source module, meaning the module from which the new entity is created. For example, if a ticket is created from a contact using a Link to other module tool, the module tool with the custom save button parameters must be created in the Contacts module.
Parameter format
update_fields_[num]=name:<button label>; fields:<field>=<value>, <field>=<value>; conditions:<field>==<value>
- The parameter name must follow the format
update_fields_[num](for exampleupdate_fields_1) nameandfieldsare mandatory- Properties are separated with a semicolon (
;) - Multiple fields or conditions are separated with a comma (
,)
Name
name:Save as status Open
Defines the label shown on the button.
Fields
fields:status=Open, severity=Minor
Defines which fields are updated and with what values when the button is used.
Conditions (optional)
conditions:category==Customer
- Defines when the button is shown
- Only the equality operator (
==) is supported - All conditions must be met for the button to be visible
- If
conditionsis not defined, the button is always shown
Conditions are evaluated on the entity being created, not on the source entity.
For example, when creating a ticket from a contact, the ticket must satisfy the condition.
This means that any field used in conditions must already have a value on the new entity at the time of creation. If the value is not set by default, it must be populated either via parameters or by an On Save type dynamic field formula so that the module tool can read it.
Example: Two custom save buttons
update_fields_1=name:Save as status Open; fields:status=Open, severity=Major; conditions:category==Customer&update_fields_2=name:Save as status Waiting; fields:status=Waiting, severity=Minor
In this example, two different save buttons are shown based on field values using cf_category (update_fields_1 only showing if cf_category==Customer), and each button updates the entity with different field status (Open, Waiting) when used.