General
Mass event triggers can be used to manage automated email communication related to the event for participants and contacts marked as staff.
Email triggers allow you to automate event-related communication, such as:
- Registration confirmations
- Reminder messages before the event
- Thank-you messages after the event
Triggers are always event-specific, and multiple triggers can be created for the same mass event for different purposes (for example, for different roles, times, or sub-events).
Emails sent by triggers are based on email templates, which are managed separately in the Emails module. Before creating a new email trigger for a mass event, make sure the required email template already exists.
Instructions for creating and editing email templates can be found in Email templates: Creating emails.
Creating a New Trigger
Mass event triggers can be created on the Triggers tab. A new email trigger is created in a step-by-step configuration view, which opens when you click Add New Email Trigger on the Triggers tab. The configuration view guides the user through the trigger creation process step by step.
When
In the first step, on the When tab, define the basic details of the trigger and when the email will be sent.
- Name – Internal name of the trigger. Not visible to email recipients.
- Mass Event / Sub-event – By default, the trigger applies to all registrants of the mass event, but you can limit recipients to those registered for a specific sub-event.
- Active – When enabled, the trigger is active and can send emails.
Then select the action that triggers the email:
- With Registration – The message is sent when a new registration is received.
- After Cancellation – The message is sent after a registration is canceled.
- With Spare Place Registration – The message is sent to those placed on the spare places during registration.
- Scheduled Sending – The message is sent at a specific time defined later on the Additional Rules tab.
We recommend that you always create a new trigger instead of editing an old one. This is because once a trigger is activated, it cannot be reactivated, even if it is edited.
What
In the second step, on the What tab, select the email content to be sent.
- Email Template – Choose the desired email template.
After selecting the template, you can preview the message using the Open Preview button.
Who
In the third step, on the Who tab, define the email recipients.
Target
- Registration’s Role – The message is sent to event registrants.
- Personnel Role – The message is sent to event staff.
Role
- Select one or more roles (e.g., Attendant, VIP).
Additional Rules
In the final step, on the Additional Rules tab, define more specific conditions for when the trigger fires.
- Conditions can be combined using AND / OR logic.
- Add new conditions with the Add Condition button.
- Group multiple conditions using the Add Group function.
For scheduled sends, define the sending time here (e.g., days or hours before or after the event start or end time).
Meeting the conditions of the trigger
For email triggers not tied to a specific time, mass event triggers check sending conditions every five minutes. Each trigger fires only once to prevent participants from receiving multiple emails for the same event.
Suppose an event is organized on short notice and has two reminder triggers:
- Reminder three days before the event
- Reminder one day before the event
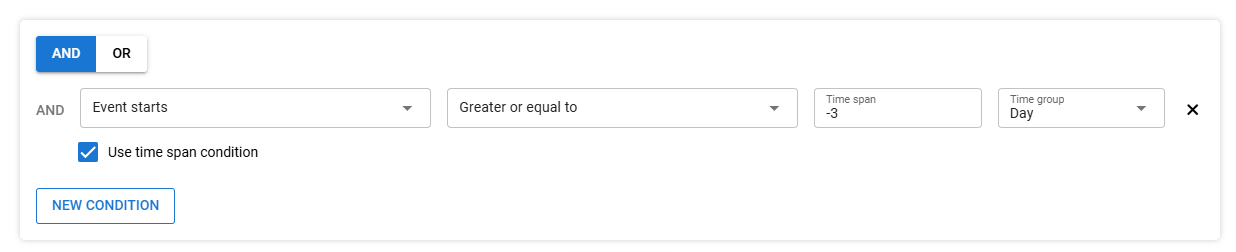
The three-day reminder is defined as a scheduled send with the condition:
Event starts – Use time span condition – Greater or equal to – -3 Days
However, the first registration occurs only two days before the event at 10:08. In this case, the trigger conditions are met during that check cycle:
- 10:08 – Eva registers
10:09 – Johanna registers
Since both registrations occur within the same five-minute check interval, Eva and Johanna receive the reminder even though the event is less than three days away.
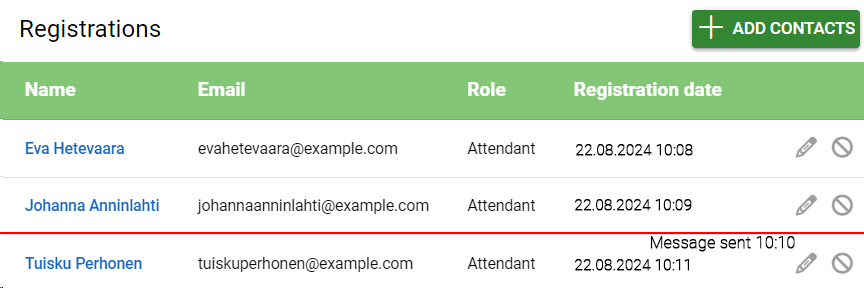
At 10:11, Tuisku registers but does not receive this message because the trigger has already fired.
The one-day reminder works similarly. It is sent to all registrants at the moment the time condition is met.
In this example, Eva, Johanna, Tuisku, and anyone else registered before the event is exactly one day away will receive the reminder.
Once a trigger has been activated, it cannot be reactivated by editing it, but a new trigger must always be created in these situations.
Example: Trigger for registration confirmation
This example creates a trigger that sends a registration confirmation message to all registrants immediately upon registration.
Selections in each step:
When
- Name: Desired name, e.g., Registration Confirmation
- Email to participant: With Registration
What
- Email Template: Template created for registration confirmation
Who
- Target: Registration’s Role
- Role: All roles
Additional Rules
- No additional conditions
With these settings, every new registrant automatically receives a confirmation message upon registration.
Example: A reminder of an event the day before
This example creates a reminder message sent to all registrants one day before the event starts.
Selections in each step:
When
- Email to participant: Scheduled Sending
What
- Email Template: Template created for event reminder
Who
- Target: Registration’s Role
- Role: All roles
Additional Rules
- Condition: Event starts – Use time span condition – Greater than or equal to – -1 Day
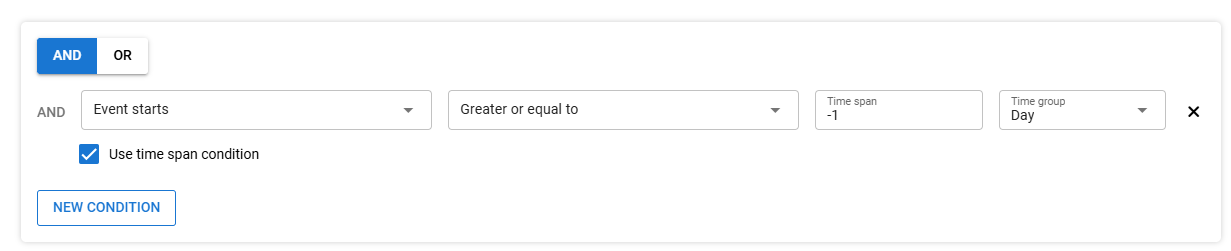
With this condition, the message is sent to recipients the day before the event.
Example: thank you message for an event
To send a thank-you message to event participants after the event ends, use the same rules as for reminders but with positive numbers. For example, a thank-you message one day after the event would use the following condition:
- Event starts – Use time span condition – Greater than or equal to – 1 Day