General
This guide concerns the module tools in general and the settings for showing and running them. For more information about defining the parameters and possible other settings for the tools, see the guide Module Tool Parameters and Settings.
With module tools it is possible to create tools for entity cards (= information view of single entity, e.g. Account card) to enable different kinds of functions (such as a tool for an Account card that creates an Activity with default status and type values).
You can manage the module tools in Settings → Module Tools.
Creating module tools
A new module tool is created by clicking the Add tool button at the top right corner. You can create different tools for different modules, for example the ones shown in the picture below.

The Link to other module tool creates a new target entity using the source entity’s field values as the new entity’s default values (e.g. information from an Account can be copied to the account information fields of a new Contact). For more information about defining the parameters and possible other settings for the tools, see the guide Module Tool Parameters and Settings.
When the tool has been created, it will appear at the top-right corner of the entity card under module tool button.
Visibility
Generally, the module tools are visible in the module they are created for, for example Accounts for Accounts module, Common for Dashboards, etc. However, the Generic tools are available in every module, and the visibility of each module tool can be managed separately.
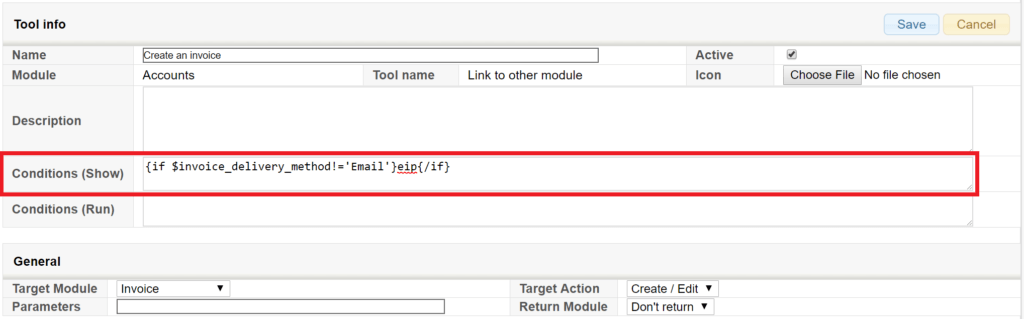
You can create conditions for the visibility while creating or editing a module tool. In the picture below, the Invoice tool is shown in the Accounts module only if the accounts invoice delivery method is set as ‘Email’. If the exclamation mark (!) would be removed, the tool would be hidden only when the delivery method is ‘Email’.
To add multiple conditions, add && between the clauses to create an AND condition (both of the conditions must be met) e.g.
{if $invoicestatus!='Created' && $duedate!='1.10.2015'}{/if}
To write an OR condition, add || between the clauses or write two separate if clauses.
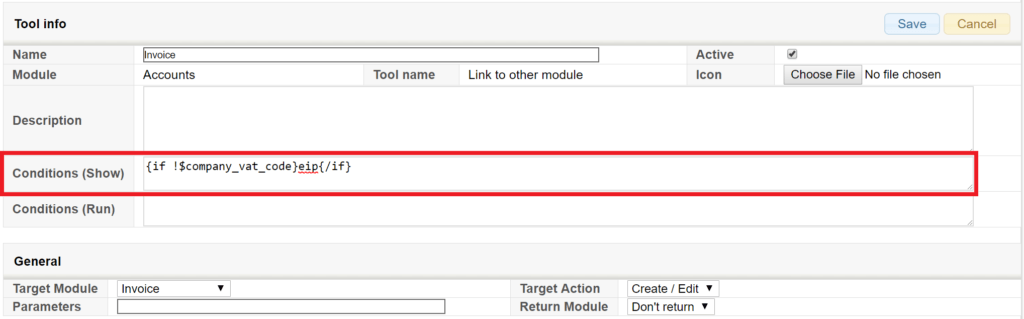
With some field types (e.g. text, number and date) it is also possible to create conditions, that the field must or must not be filled. In the picture below, the Invoice tool is not shown for the customer if it does not have a VAT code. So if the exclamation mark (!) is placed before a field ($company_vat_code), that field must be blank. If exclamation mark is placed after the field, that field must be filled.
Examples:
The parts marked with orange in the formulas must be replaced with the id of the wanted role/user. The ids are similar to the ones in the examples.
- The tool is visible only to admin users:
{if $USERID|getUserFieldValue:'is_admin'!='on'}eip{/if} - The tool is visible only to users of a certain role:
{if $ROLEID!='H1'}eip{/if} - The tool is visible only to a certain user:
{if $USERID!=12345}eip{/if} - The tool is visible only to/ with a certain system language:
{if $LANGUAGE != 'fi_fi'}eip{/if}
- The tool is visible to/ with any other language, than the set one:
{if $LANGUAGE == 'fi_fi'}eip{/if}
Conditions for running the tool
It is also possible to determine conditions for when running the tool is allowed, if necessary. These conditions are written in the field Conditions (Run).
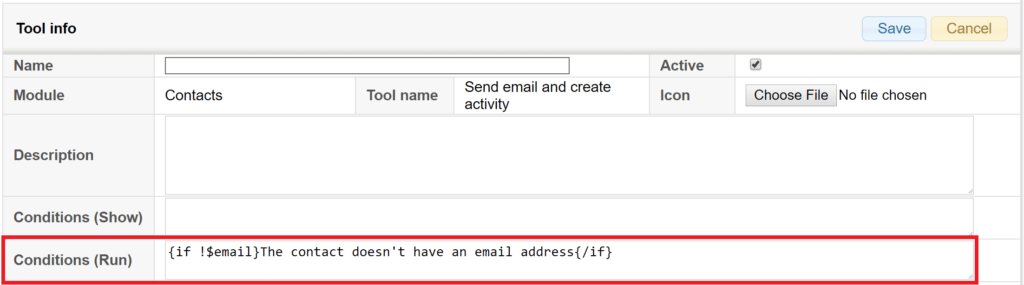
For example in the picture below, the use of the tool is blocked if the contact does not have an email address. The text written in between the brackets (“The contact doesn’t have an email address” in the picture) is shown to the user in an error message.
Module tool custom icon
It is possible to add a custom icon to any module tool. If you are interested in this functionality, please contact our support to get started. Here are some examples of the available icons:
| House | |
| Globe | |
| Headset | |
| Circled Question Mark | |
| Cloud |