General
Campaign segmentation is an important part of marketing strategy, helping organisations target their messages to the right audiences. Segmentation refers to dividing contacts into different groups whose members share similar characteristics, such as age, gender, interests or location.
With the campaign segmentation tool, you can easily create different segments from your contacts based on specified criteria. For example, you can create a segment of members who have participated in certain events, members who fall into a specific age group, etc.
This guide covers campaign segmentation. For more information about campaigns and their record cards, see the guide for Campaigns.
Campaign segmentation is recommended for individual and manually updated campaigns. Admin users can create campaigns that automatically update contacts according to set conditions. For instructions, see the article Automatically updating email campaigns.
Start
A new campaign is started by creating a new campaign or going to the record card of the campaign you want to segment. In this guide, we will introduce email campaigns, but other campaign types work largely on the same logic. The only difference between other campaigns and email campaigns is that only contacts with an existing email address are added to the segmentation in email campaigns. The system will notify you of this in the segmentation settings (picture below).

In the case of a completely new campaign, the contact list is empty, and the user has the following buttons available:
- Settings – The settings are used to manage the campaign segmentation settings, which determine how contacts are loaded into the campaign.
- Add contacts – This button opens the Contacts module, where the user can select one or more contacts to add to the campaign list. This allows you to add contacts to the campaign that would otherwise be excluded based on the campaign settings.
Campaign relations tab view
When a campaign has existing relations, the campaign view changes slightly from what it looks like when the campaign is empty. The Connections tab contains the following sections:
-
- KPI contacts shows the number of contacts in the campaign.
- KPI campaign marketing bans shows how many contacts have left the campaign via the Unsubscribe link in the email.
- The Refresh Settings button checks the segmentation settings, clears the list and downloads contacts to the list according to the conditions specified in the settings.
- The Settings button controls the segmentation target and criteria. Changing the settings clears the list and downloads contacts to the list according to the conditions specified in the settings.
- The Add contacts button opens the list view of the Contacts module. Here, the user can add one or more contacts to the campaign. This button is useful in cases where you want to add people to the campaign who do not meet the conditions specified in the campaign segmentation settings.
- The Delete all button clears all contacts added to the campaign from the campaign connections list.
- The list view shows all contacts loaded for the campaign. Individual contacts can be deleted from the campaign using the recycle bin icon.
Building segmentation rules
Clicking the Settings button opens the Campaign settings pop-up window, where the user first makes two selections:
- Start module – Select the module from which the contact is searched. The list of selectable start modules shows the modules that have a Contact link.
- Field – Based on this selection list, select the field from which the contact is searched.
Selecting Start module → Contact and Field → Contact filters the data from all contacts in the Contacts module. However, there are situations where you want to initially filter the data based on some other field. We will explain these in the examples below.
The start module and field alone are sufficient for building a campaign, and in this case, all contacts in the field of the module in question are retrieved for the campaign. Each contact is added to the campaign only once, even if it appears in the same field multiple times.
If there are multiple contacts in the system with the same email address, for example, these contacts may end up in the campaign multiple times. However, campaigns are constantly being developed, and future versions of the feature will also include the option to remove duplicate emails.
Conditions
However, the purpose of campaign segmentation is often to limit the contacts selected for the campaign. For this purpose, conditions are used that work with AND/OR logic. The options displayed in the conditions are determined based on the system settings and the selections made by the user in the conditions.
To illustrate the general logic of conditions, we have compiled examples of how conditions can be used to limit the number of contacts in different use cases.
Whenever conditions are changed, the campaign contact list is completely cleared and the contacts are reloaded into the list so that they match the new conditions given for segmentation.
Updating the contacts of the campaign
Contacts of the campaign are updated using the Refresh settings button. This acts same way as updating the settings of the campaign, so it clears the list and downloads contacts to the list according to the conditions specified in the settings. The button is there to make updating the contacts on the campaign quicker, but the functionality is the same.
Example: Campaign containing guardians of new members
In this example, the Contacts module contains members, and the Guardian field is used to indicate the primary guardian of minors. In addition, we only want to include members who joined the organisation during 2025. In this example, we have used the contact creation time, but the field could be, for example, the membership start date if such a field exists in the system.
We therefore make the following settings:
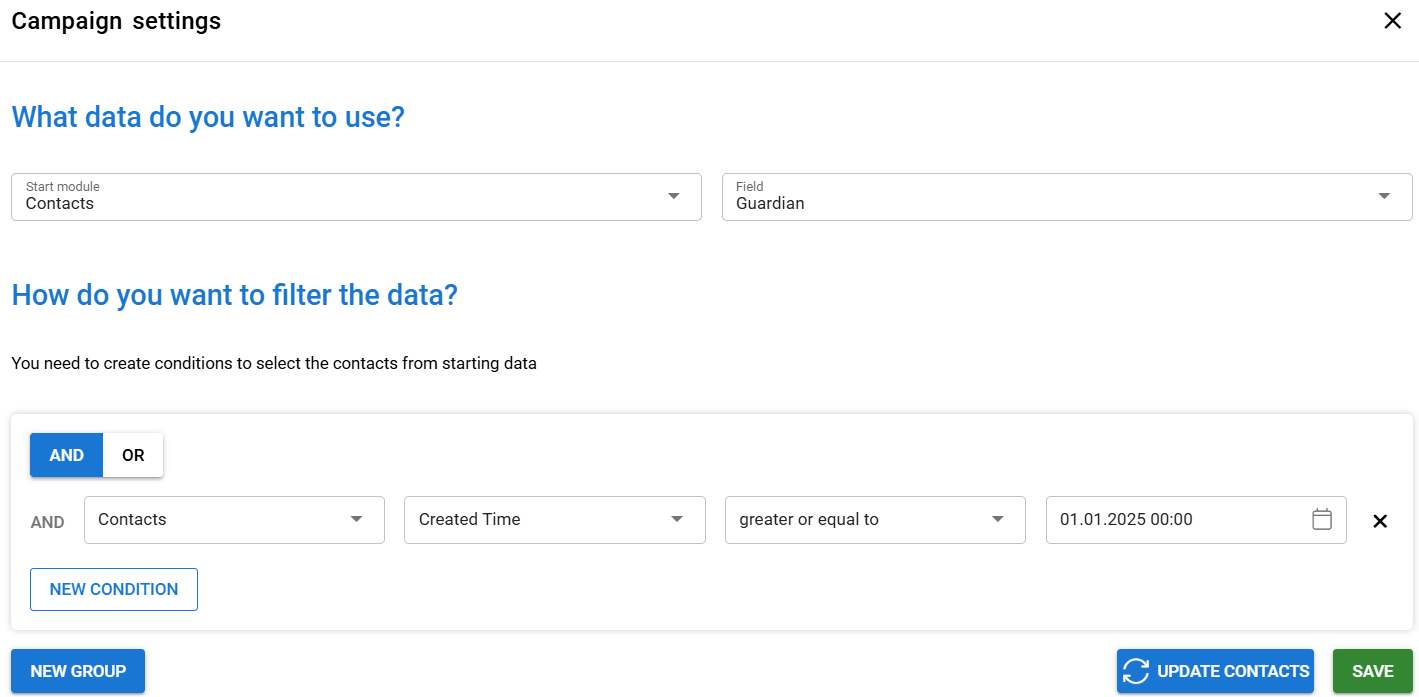
- We select Contacts as the start module and Guardian as the field.
- In the conditions, we select the Contact module again and the creation time field. Since we only want to include memberships that started in 2025, the condition for the creation time is Greater than or equal to 01.01.2025 00:00.
The campaign in the example above will provide a list of all guardians of members (contacts) created in 2025. Another option for building such a campaign would be to select Contact as the start module, Contact as the field, and in addition to the creation time, add the condition that the Guardian field has a value.
Example: Campaign for members of a specific local association
In this example, we want to send a message to all members in the Contacts module who belong to a local association (organisation) called Example Association. We therefore make the following settings for the campaign:
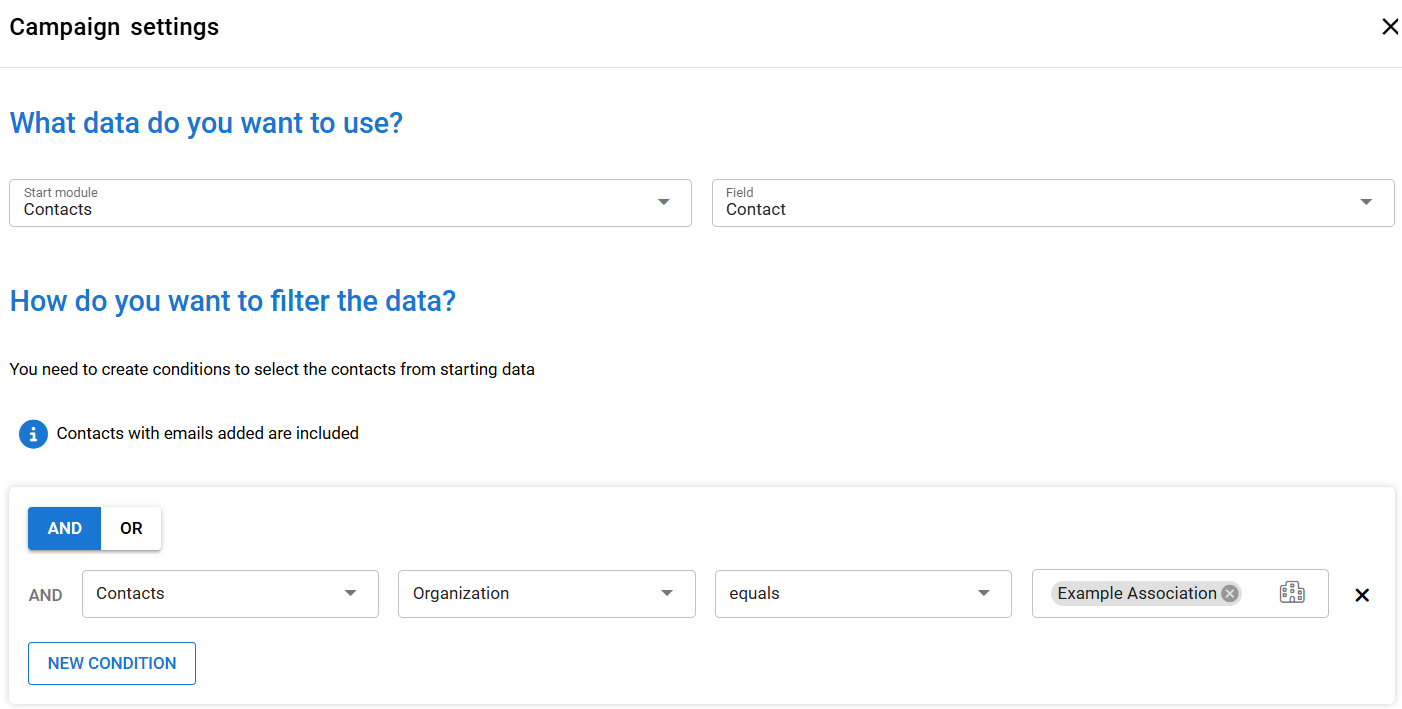
- Select Contacts as the start module and Contact as the field.
- In the conditions, we specify that the Organisation field of the contact must be equal to Example Association.
The campaign in the example above will load all contacts belonging to the organisation named Example Association.
Example: A campaign that includes local association members whose membership fees are unpaid
In the previous example, the message was sent to all members of the local association, but next we want to narrow down this segment even further. In our example, we are only looking for members of the local association whose membership fees are unpaid. In the example system, paying the membership fee through any means marks the ‘Paid’ field. In this case, members who have not paid their membership fees are included in the segment with the following conditions:
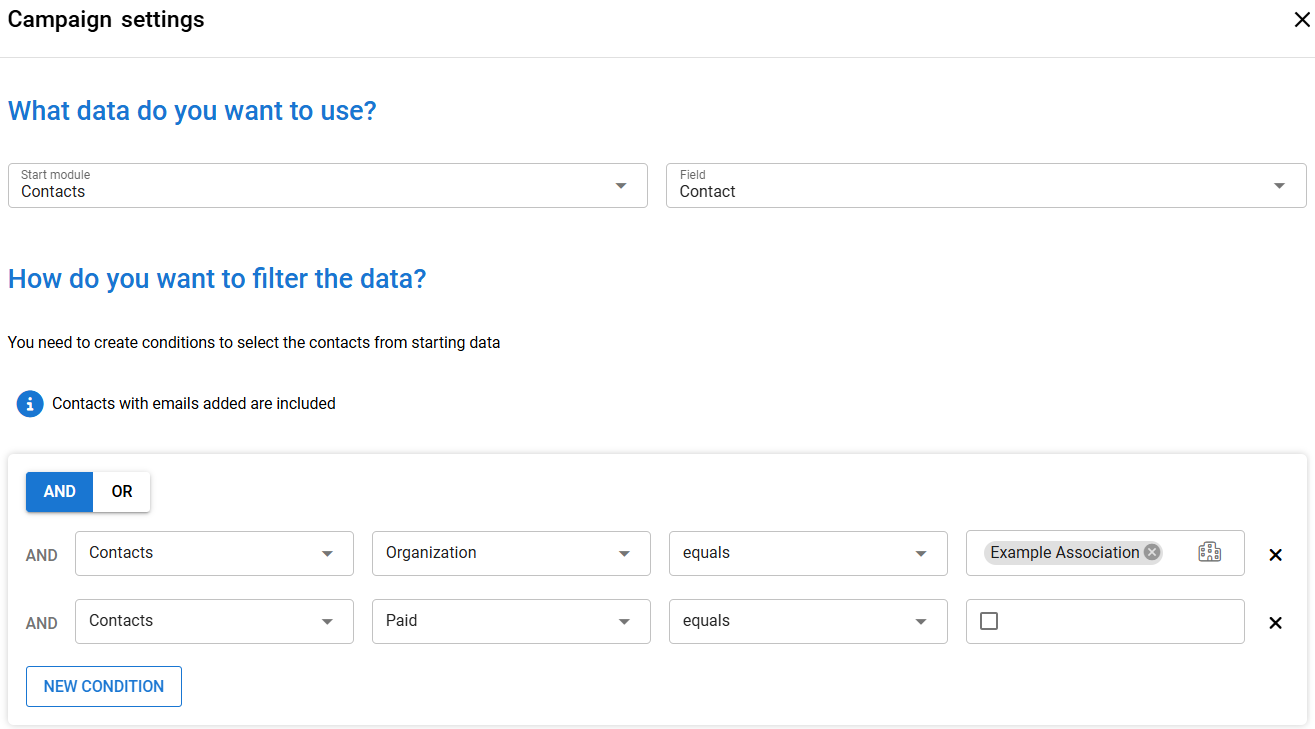
- The start module is set to Contacts and the field is set to Contact.
- The conditions specify that the Organisation field of the contact must be equal to Example Association.
- In addition, the condition is set so that the Paid field is equal to empty.
With the above conditions, the campaign lists all contacts whose local association is Example Association AND whose membership fee is unpaid. Another option would be to perform a search through the Invoices module with the following conditions:
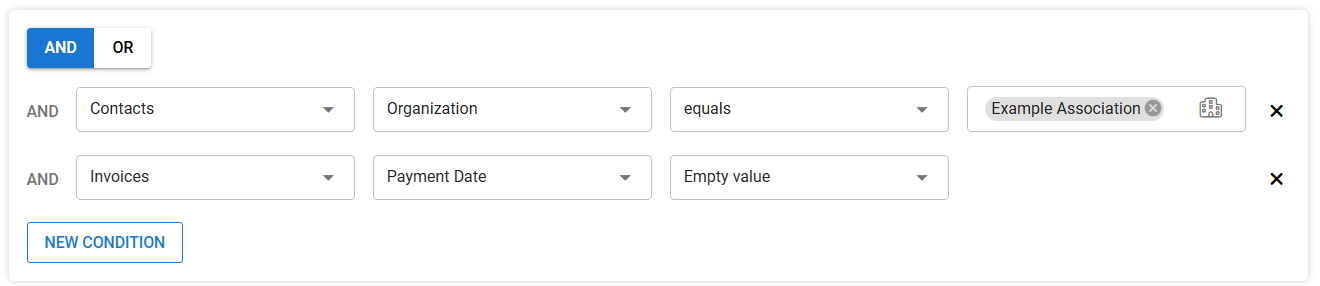
- The contact’s Organisation must be Example Association.
- The Invoices module is used to search for invoices where the Payment date is empty.
The above conditions will search for all members of the Example Association who have at least one unpaid invoice in the system.
If the association does more than just invoice members, the conditions should also be set to only select invoices for membership fees from the system. Depending on the situation, you can use the Invoice date, for example.
Example: Campaign for people who participated in certain events
Next, we want to send a message to people who have participated in events organised by an organisation called Tallustajat. Each event organised by this organisation includes the name of the organisation, and we do not want to include contacts who have registered for events but have cancelled all their registrations. We would therefore segment using the following conditions:
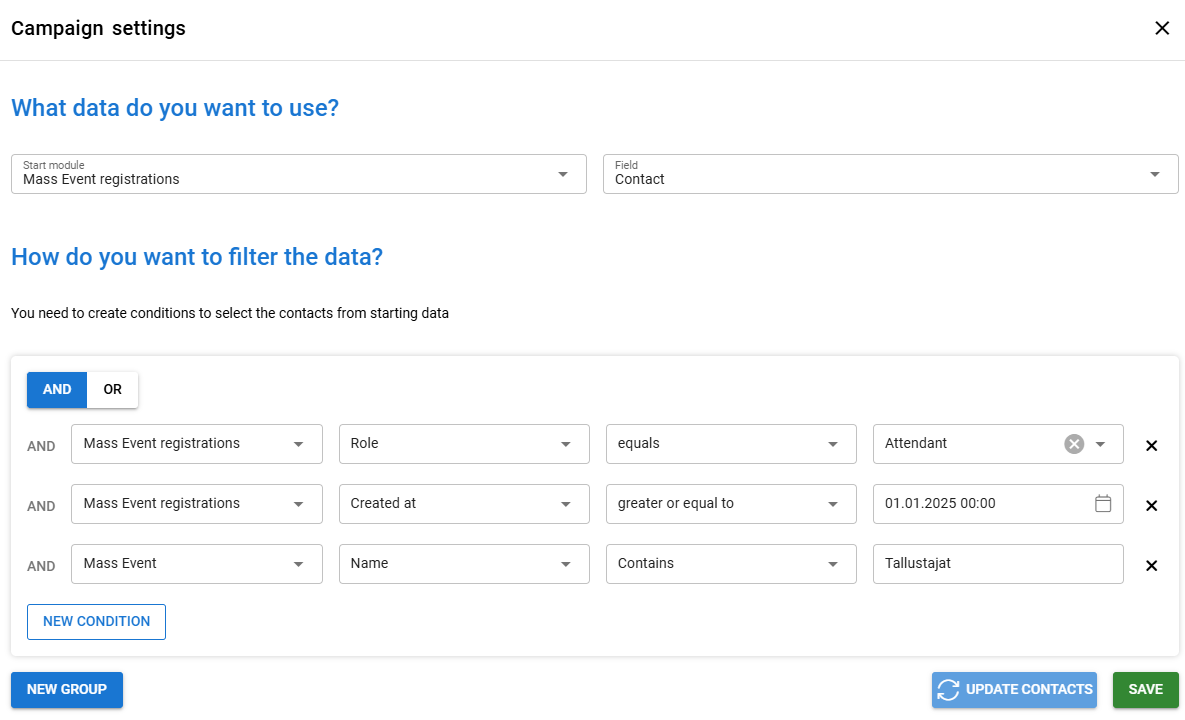
- The start module is Mass event registrations and the field is Contact.
- In the conditions, we specify that the Participated field is checked in the Mass event registrations contact list.
We only search for Mass events whose name contains the organisation name Tallustajat.
Finally, for Mass event registrations, we specify that Cancelled must not be empty.
The above conditions are used to search for participants in all mass events whose name contains the organisation name Tallustajat.
When it comes to cancellations, it is important to note that if there are several events and a person has cancelled their participation in only one of them, they will still appear in the campaign contacts because they have participated in other events. With the above conditions, the contact will not appear on the campaign list in situations where they have cancelled their participation in all events of the example association, but even one participation will add them to the campaign contact list.
Example: Message to all local association chairmen
In this example, the local associations are located in the Organisations module, and the contact selection field Chairman can be found on the organisation’s record card. Each association can have only one chairman. If we wanted to collect all the chairmen of local associations for the same campaign, we would do so with the following settings:
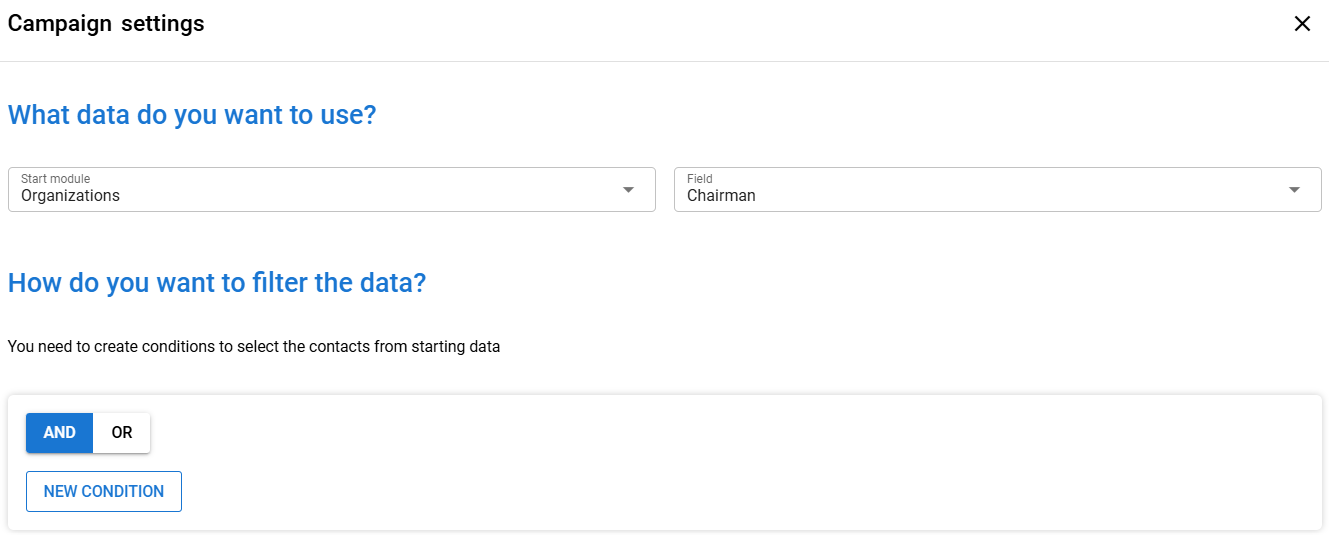
- Set Organisations as the start module
- Select Chairman as the field
With the above settings, the system will search for all contacts in the Chairman field of Organisations for the campaign. We do not need to set any conditions since we want all chairmen in the list.
If the same contact has been selected as the chairman for multiple associations, they will only appear once on this list (excluding duplicates in the system, as the campaign currently only checks that the same CRMID does not appear multiple times in the campaign).