General
The HelpDesk module is used for various support communication functions using tickets. Tickets can be created via email, Self-Service Portal, or manual input, allowing your support team to use multiple different contact channels.
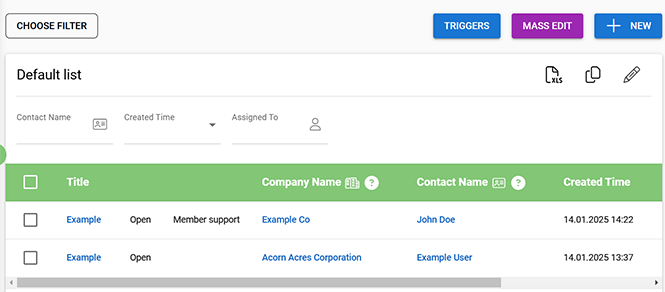
HelpDesk Module View
The HelpDesk module view is where users find all the support tickets they have permission to. HelpDesk has all basic module features, but it also has button Triggers where it is possible to set up rules for different types of email notifications.
Ticket Entity Card
The ticket entity card is very customisable since there are only a few fields the system requires for this functionality to work.
- Ticket Name – Always a mandatory field.
- Assigned To – Always a mandatory field representing who is responsible for the ticket. Responsible users will receive emails when they are triggered.
- Account Name – See which account the ticket is related to. Does not need to be mandatory.
- Contact Name – Shows who is the contact person for the ticket. This field is required for both email triggers and accessing the tickets via the Self-Service Portal.
- Comments – This discussion block is used for all ticket communication between the support team and the customer.
- Solution information – Text field where the solution of the ticket is entered.
We also recommend the following fields and blocks:
- Status – Picklist type field that can be used to track the status of the tickets. This makes it easier to sort through open/closed tickets.
- Category – Picklist type field that makes organising tickets easier.
- Internal Comments – If tickets and/or their solutions require teamwork, the internal comments section makes it easier to discuss that specific ticket.
- Priority and/or Severity – These fields can be used to prioritise the tickets.
Comments/Internal Comments are based on the Discussion tool. The guide Discussion explains how to use it.
Ticket Triggers
Triggers are used to inform both the customer and the user responsible for the ticket via email. Tickets can have multiple different types of triggers. Rules are determined in the module view and the same rules apply to all tickets that meet the conditions of the trigger. To manage all the triggers, click the Triggers button to open up the trigger management window (see picture below).
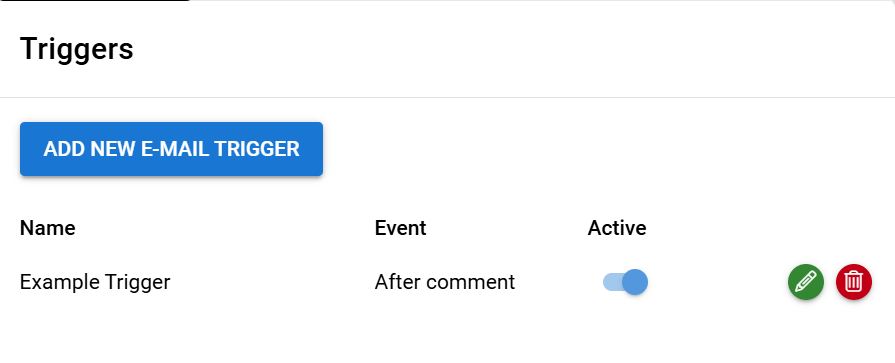
In the trigger view, the user sees all the available triggers, their status and which event activates each trigger. Triggers can be edited using the pen icon or deleted by using the trashcan icon.
Users can also toggle the activity status of each trigger from the main view or create new triggers by using the button Add new e-mail trigger.
Trigger Creation
When the new trigger is created, it needs a name, an event that activates the trigger, an email that is sent when the trigger is activated and a target where the email is sent (see picture below).

Trigger Events
There are four different types of trigger events, and each one of them behaves differently.
- After Create – This event activates the trigger when a new ticket is created.
- After Update – This event can be used to follow the changes in a specific field, like the Status of the ticket.
- After Comment – This event sends an email notification when the counterpart of the ticket comments on it.
- Scheduled sending – Used with conditions, this field sends email at a specific time.
From these After Create and Scheduled Sending are triggers that activate once the first time conditions are met. After Update and After Comment trigger every time the specific field is updated or the ticket is commented on. Comments only trigger when they come from the counterpart of the ticket, so users won’t get email notifications when they have add comments to the ticket.
Ticket Email Template
Ticket email creation does not differ from the regular email template creation and the email template editor tag feature includes a selection of ticket tags. You can read more about the creation of the email templates in the guide Email templates: Creating emails.
Tickets – Frequently Asked Questions
How can tickets be created in the Tickets module?Tickets can be created via email, through the Self-Service Portal, or by manual input.
How does the trigger system work in the Tickets module?
Triggers inform both the customer and the responsible user via email, sending wanted email template when the specific conditions are met. Trigger settings are found at the tickets module behind the Triggers button.
Quiz
Glossary
- Email Template
- Premade layout for an email that can be used repeatedly to send out messages with a consistent look and content. Desired email content can be entered by typing and using tags to fetch the wanted information from the system.
- Entity Card
- Information view of a single entity, e.g., Ticket card.
- Self-Service Portal
- Service platform for your customers, where things like membership information and event registrations can be handled effortlessly.
- Ticket
- Ticketing is a method for users to report problems or request assistance from the support team. Usually, one ticket represents one support request, which is then handled using the Discussion feature and closed after the solution is found.
- Trigger
- Automation rule used to manage event- and condition-based automatic email communication, sending the desired email to the recipients when the conditions of the trigger are met.